
Have you ever encountered the frustrating issue of your GPU not being detected?
When your GPU is not detected, it can lead to poor graphics performance, laggy gameplay, and other issues that hinder your overall computing experience.
In this article, we will explore various steps and solutions to help you fix the GPU not detected issue. Whether you’re a gamer, a graphic designer, or someone who relies on their GPU for tasks like video editing or 3D rendering, getting your GPU back up and running smoothly is essential.
Let’s jump right in!
How to Fix “gpu not detected”
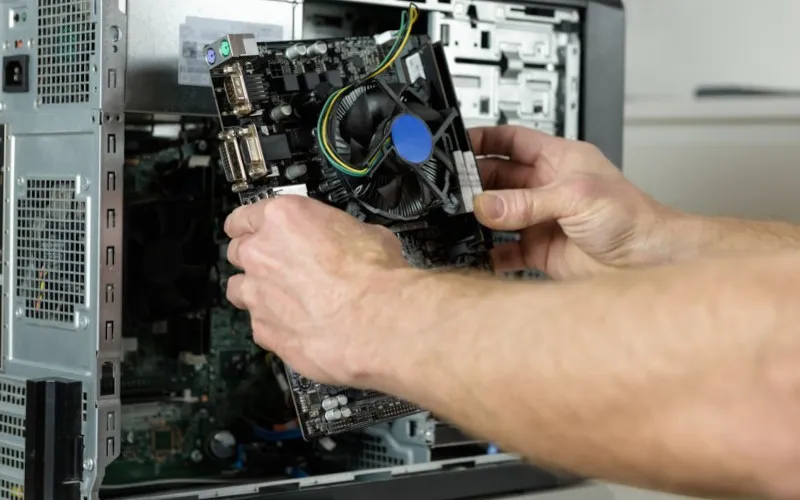
1. Check Hardware Connections
Let’s start by checking the hardware connections to ensure everything is properly connected. Sometimes, a loose connection can be the culprit behind the GPU not being detected.
Follow these step-by-step instructions to make sure everything is securely in place:
- Shut down your computer completely. Turning off the power before working with any internal components is important.
- Open up your computer case. The process of opening the case will vary depending on your computer type. Typically, you must remove screws or slide off a side panel to access the internal components. If you’re unsure how to do this, refer to your computer’s manual or search online for specific instructions for your model.
- Locate the GPU. The GPU is a separate card usually situated in one of the PCIe slots on the motherboard. It’s typically larger than other cards and has multiple connections at the back.
- Check the seating of the GPU. Ensure that the GPU is securely seated in the PCIe slot. Press down on the GPU to ensure it is firmly in place. Sometimes, the GPU may become slightly dislodged due to vibrations or movement, causing detection issues.
- Verify power connections. Take a look at the power cables connected to the GPU. Most modern GPUs require additional power from the power supply unit (PSU). Ensure all the required power cables are properly connected to the GPU. They should fit snugly without any loose connections.
- Inspect the PCIe slot. While the case is open, examine the PCIe slot where the GPU is installed. Look for any dirt or debris that may be obstructing the connection. Use compressed air or a soft brush to clean the slot gently if you see any.
- Close the computer case. Once you’ve checked and secured all the connections, carefully close the computer case and tighten any screws removed earlier.
- Power on the computer. After closing the case, plug in the power cord and turn on your computer.
- Check if the GPU is detected. Once your computer boots up, go to the Device Manager (you can search for it in the Windows search bar) and expand the “Display adapters” section. If you see your GPU listed there without any warning symbols, it means that the GPU is now being detected properly.
By carefully following these steps to check the hardware connections, you’ve taken an important step in troubleshooting the “GPU not detected” issue.
If the issue persists, move on to the next steps to get your GPU running smoothly again.
2. Update GPU Drivers
Outdated drivers can sometimes cause issues with GPU detection. Follow these detailed step-by-step instructions to update your GPU drivers:
- Identify your GPU model. Before you proceed, it’s important to know the specific model of your GPU. You can usually find this information by referring to the documentation on your computer or by checking the manufacturer’s website.
- Visit the manufacturer’s website. Once you know the GPU model, go to the official website of the GPU manufacturer. For example, visit the NVIDIA website if you have an NVIDIA GPU. Look for a “Drivers” or “Support” section on the website.
- Locate the driver download page. Navigate to the driver download page on the manufacturer’s website. This page is where you’ll find the latest drivers for your GPU model.
- Select the appropriate driver. You may need to select your GPU model, operating system, and other relevant details on the driver download page. Make sure you choose the correct options to ensure compatibility.
- Download the driver. Once you’ve selected the appropriate driver, click the “Download” button to start downloading. The file size may vary depending on the driver version and your internet connection speed.
- Run the driver installer. Once the driver download is complete, locate the downloaded file (usually in your computer’s “Downloads” folder) and double-click on it to run the installer. This will begin the installation process.
- Follow the on-screen instructions. The driver installer will guide you through the installation process. Read and follow the on-screen instructions carefully. You may be asked to agree to terms and conditions, choose an installation location, or customize installation settings.
- Restart your computer. After the driver installation is complete, it’s recommended to restart your computer. This ensures that the new driver is properly loaded and applied.
- Verify driver installation. Once your computer has restarted, go to the Device Manager again and expand the “Display adapters” section. Check if your GPU model is listed without any warning symbols. This indicates that the updated driver has been successfully installed.
Outdated drivers can often cause compatibility problems, and updating them can help ensure that your GPU functions optimally.
3. Adjust Settings
Adjusting the BIOS settings to ensure that the PCIe slot where your GPU is installed is enabled. Here’s a detailed step-by-step guide to help you navigate through the BIOS settings:
- Restart your computer. To access the BIOS settings, you’ll need to restart your computer. Save any ongoing work and click the “Restart” option from the Start menu.
- Access the BIOS. As your computer restarts, pay attention to the initial screen. You should see a message indicating which key to press to enter the BIOS setup. Common keys include Del, F2, F10, or Esc. Press the specified key repeatedly until the BIOS setup utility appears.
- Navigate to the “Integrated Peripherals” or “Onboard Devices” section. The location of these settings may vary depending on the BIOS version and motherboard manufacturer. Use the arrow keys on your keyboard to navigate the different sections and look for an option related to peripheral or onboard devices.
- Enable the PCIe slot. Once you’ve located the relevant section, find the option to enable or disable the PCIe slot where your GPU is installed. It might be labeled as “PCIe Slot Configuration,” “PCIe Slot Control,” or something similar. Select this option and make sure it is set to “Enabled.”
- Save and exit the BIOS. After enabling the PCIe slot, it’s important to save the changes you made and exit the BIOS setup utility. Look for the option to save and exit, usually labeled as “Save Changes and Exit,” or something similar. Select this option and confirm your choice when prompted.
- Restart your computer again. Your computer will restart once you’ve saved the changes and exited the BIOS. Allow it to boot up normally.
- Check if the GPU is detected. After restarting your computer, go to the Device Manager and expand the “Display adapters” section. Verify if your GPU model is listed without any warning symbols. If you see your GPU listed, then congratulations! The BIOS adjustment may have resolved the GPU not detected issue.
Sometimes, the PCIe slot where the GPU is installed may be disabled in the BIOS, causing detection problems. Enabling it can help ensure that the GPU is recognized properly.
If adjusting the BIOS settings doesn’t solve the issue, there are still more steps we can explore to get your GPU up and running smoothly again.
4. Disable Integrated Graphics
Disable the integrated graphics to see if that resolves the GPU not detected issue. Here’s a detailed step-by-step guide to help you disable integrated graphics:
- Open the Device Manager. To access the Device Manager, right-click the Start button and select “Device Manager” from the menu.
- Expand the “Display adapters” section. In the Device Manager window, locate and click on the arrow next to the “Display adapters” section to expand it. This will show you the list of display adapters installed on your computer.
- Identify the integrated graphics adapter. Look for the entry that represents the integrated graphics adapter. It may be labeled as “Intel HD Graphics,” “AMD Radeon Graphics,” or something similar. Please take note of its name for future reference.
- Right-click on the integrated graphics adapter. Once you’ve identified the integrated graphics adapter, right-click on its entry in the Device Manager list. A context menu will appear.
- Select “Disable” from the context menu. In the context menu, select the “Disable” option. This will disable the integrated graphics adapter.
- Confirm the action. You may be prompted with a warning message about the consequences of disabling the device. Read the message carefully and make sure you understand the implications. If you’re confident about disabling the integrated graphics, click “Yes” or “OK” to confirm.
- Restart your computer. After disabling the integrated graphics, it’s recommended to restart your computer. This allows the changes to take effect.
- Check if the GPU is detected. Once your computer has restarted, return to the Device Manager and expand the “Display adapters” section again. Verify if your discrete GPU (the one you want to use) is listed without any warning symbols. If you see your discrete GPU listed, then congratulations! Disabling the integrated graphics may have resolved the GPU not detected issue.
Sometimes, conflicts between the integrated graphics and the discrete GPU can cause detection problems. Disabling the integrated graphics allows your computer to focus solely on detecting and utilizing the discrete GPU.
5. Reset CMOS
Resetting CMOS can help resolve certain hardware issues, including undetected GPUs. This process involves working with your computer’s hardware, so proceeding cautiously is essential.
Here’s a detailed step-by-step guide on how to reset CMOS:
- Shut down your computer completely. Turning off the power before working with any internal components is important.
- Disconnect the power cord from the back of your computer. This will ensure that there is no electrical current flowing through the system.
- Open up your computer case. The process of opening the case will vary depending on your computer type. Typically, you must remove screws or slide off a side panel to access the internal components. If you’re unsure how to do this, refer to your computer’s manual or search online for specific instructions for your model.
- Locate the CMOS battery. The CMOS battery is a small, round battery on your computer’s motherboard. It provides power to the CMOS chip, which stores the BIOS settings. The battery is typically silver or metallic in color and may be secured in place with a clip or holder.
- Carefully remove the CMOS battery. To reset CMOS, we need to remove the CMOS battery momentarily. Use your fingers or a small tool to push or lift the clip securing the battery gently. Once the clip is released, carefully lift the battery from its socket. Please take note of the battery’s orientation, as you must place it back correctly later.
- Wait for a few minutes. With the CMOS battery removed, wait for approximately 3-5 minutes. This waiting period allows the residual charge in the system to dissipate fully, which helps reset the CMOS settings.
- Press and hold the computer’s power button. While the CMOS battery is removed, press and hold the power button on your computer for about 15-20 seconds. This action helps discharge any remaining electrical charge in the system.
- Reinsert the CMOS battery. After the waiting period, carefully place the CMOS battery back into its socket, ensuring it is oriented correctly. Gently press down to secure it in place.
- Close the computer case. Once you’ve reinserted the CMOS battery, carefully close the computer case and tighten any screws removed earlier.
- Reconnect the power cord. Plug in the power cord to the back of your computer.
- Power on your computer. Press the power button to turn on your computer. The CMOS settings will be reset to their default values.
- Check if the GPU is detected. Once your computer has booted up, go to the Device Manager and expand the “Display adapters” section. Verify if your GPU model is listed without any warning symbols. If you see your GPU listed, then congratulations! Resetting the CMOS may have resolved the GPU not detected issue.
Resetting CMOS can help resolve certain hardware-related issues by restoring the default settings. If the GPU not detected problem persists, there are still more steps we can explore to find a solution.
6. Test the GPU on Another System
Testing the GPU on another system can help identify whether the issue lies with the GPU itself or your current system. Here’s a detailed step-by-step guide on how to test the GPU on another system:
- Find another compatible system. Look for another computer that is compatible with your GPU. Ideally, this system should have a compatible PCIe slot and meet the power requirements for your GPU to function properly.
- Power off both systems. Before proceeding, ensure that both the system with the GPU and the system you’re testing it on is completely powered off. This minimizes the risk of damaging any components during the process.
- Open the case of the system to be tested. Like in the previous steps, you’ll need to open the case of the system you’re using for testing. Follow the manufacturer’s instructions or refer to online resources if needed.
- Locate the PCIe slot. Identify the PCIe slot on the motherboard of the system you’re testing. It may be labeled as “PCIe x16” or something similar. Make sure the slot is free from dust or debris.
- Remove the existing GPU (if any). If the system has a graphics card already installed, carefully remove it by unscrewing any securing screws and gently disconnecting any power cables or connectors. Keep track of the screws and cables for reinstallation later.
- Install the GPU being tested. Gently insert the GPU into the PCIe slot on the system’s motherboard you’re testing. Ensure that it is properly aligned with the slot and firmly seated. Secure the GPU in place using the appropriate screws or clips.
- Reconnect the power cables. Connect the necessary power cables from the power supply unit to the GPU. Refer to the GPU’s manual or online resources for the required power connections.
- Close the case. Once the GPU is securely installed and the power cables are connected, carefully close the case of the system you’re testing. Ensure that all screws are properly tightened to avoid any loose connections.
- Power on the system. Connect the power cable to the system and turn it on. Allow the system to boot up completely.
- Install GPU drivers (if needed). Depending on the operating system of the system you’re testing, you may need to install the appropriate GPU drivers. These can usually be downloaded from the manufacturer’s website. Follow the instructions provided for driver installation.
- Run graphics-intensive applications or tests. To test the GPU’s performance and functionality, run graphics-intensive applications or perform benchmark tests. This could include running video games, 3D rendering software, or GPU stress tests. Monitor the performance and stability of the system during these tests.
- Observe the GPU’s behavior. Pay attention to any signs of instability, artifacts, or abnormalities in the display output. If the GPU functions properly without any issues, it suggests that the GPU itself is likely not the cause of the problem.
If the GPU works fine on the other system, it indicates that the issue might be related to your original system’s configuration or compatibility. If the GPU exhibits similar issues on the other system, it could suggest a problem with the GPU itself.
Remember to handle all components carefully and follow proper safety precautions throughout the testing process.
Conclusion
Troubleshooting the “GPU not detected” issue requires a systematic approach to identify and resolve the underlying problem.
Here’s a recap of the step-by-step instructions covered:
- Check the physical connections: Ensure that the GPU is properly seated in the PCIe slot, and all power cables are securely connected.
- Update GPU drivers: Install the latest drivers from the manufacturer’s website to ensure compatibility and optimal performance.
- Verify BIOS settings: Access the BIOS/UEFI settings and ensure that the PCIe slot is configured correctly and not disabled.
- Disable integrated graphics: Access the device manager and disable any integrated graphics adapters.
- Reset CMOS: Remove the CMOS battery from the motherboard for a few minutes to reset the BIOS settings.
- Test the GPU in another system: If possible, install the GPU in a compatible system to determine if the issue is specific to your current setup.
Remember to exercise caution when working with computer hardware, and always power off and disconnect your system before making any changes. Keep track of any important data and backups to protect your files throughout the troubleshooting process.
Following these steps can increase your chances of resolving the “GPU not detected” issue and get your system back up and running smoothly.
Good luck with troubleshooting, and may you soon enjoy the full potential of your GPU!


