
Are you looking for a way to connect your Nintendo Switch to the internet? Gamers worldwide use switches to access and connect to the internet and enjoy their favorite games.
A Nintendo Switch makes it easy to access and connect to the internet via a wired or wireless connection. Sometimes you may face the problem of your switch not connecting to the internet.
This can be a frustrating experience, especially if you are in the middle of playing a game. The issue can be caused by several factors, including incorrect settings, a problem with the router, or an issue with the Switch itself.
This guide will show you how to connect your Switch to the internet so that you can enjoy all the features that it has to offer.
How To Fix a Nintendo Switch That Won’t Connect To The Internet?
When your Nintendo Switch doesn’t connect to the Internet, there are a few things you can do to try and fix the problem.
The following are some troubleshooting tips:
1. Reduce Wi-Fi Interference
The Wi-Fi antenna is obstructed when the Nintendo Switch is placed in the dock. This can lead to a reduction in connection quality and potentially cause the console to lose its connection to the network.
You need to take the Switch out of the dock and place it where there are no obstacles between it and the router.

If you find that your Switch is having trouble connecting to the internet, try removing it from its dock and placing it closer to your router. This should help boost the signal and improve connectivity. You can also reduce interference by turning off devices in your home that emit a wireless signal, like microwaves or baby monitors.
Also, ensure you’re using a 2.4GHz network rather than a 5GHz one, as the Switch doesn’t support the latter.
2. Install Game And System Updates
Outdated software can often cause internet connection issues on the Nintendo Switch. Updating means getting the latest security patches, bug fixes, and performance improvements that can help improve your overall experience with the console.

If your switch can’t access the network, you can’t update the system automatically. Your switch may have previously downloaded a system update while connected to the internet, so you can try installing any waiting updates.
To do this, go to System Settings > System > System Update.
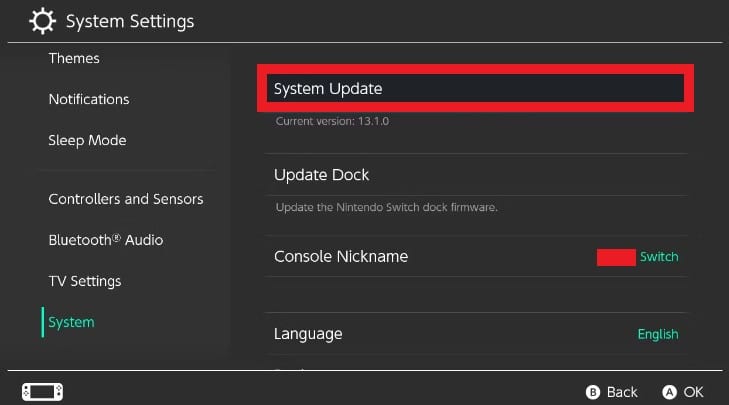
You will need to update the system manually if there are no installation updates. To do this, you will need to visit Nintendo’s support website on your computer or mobile device and download the system update.
Once downloaded, you can transfer it to your Nintendo Switch using a USB cable and install it from System Settings > System > Update Software.
3. Review the Switch’s Network Settings
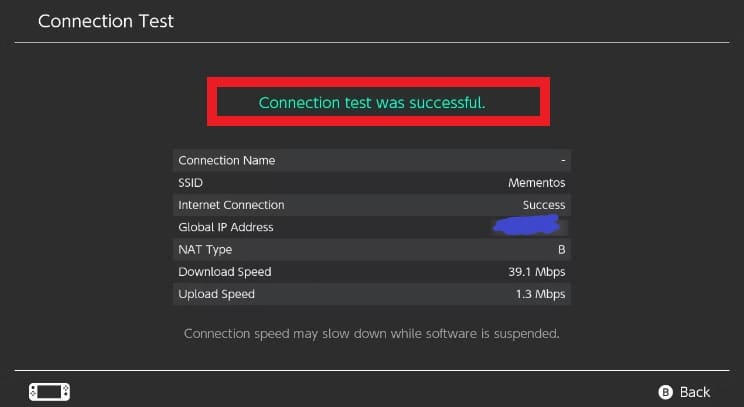
If the problem persists, you can try to review the Switch’s network settings. This is done by going into the System Settings from the HOME Menu, then selecting “Internet” and “Internet Settings.” Once you’re in the network settings menu, you can try to select “Connect to the Internet” again.
From the dashboard, click on Test Connection and evaluate the results. If the test does not complete successfully, note down the error and try to search online on how to fix that particular error. After you’ve made the necessary changes, go back and try it again.
If you share your networks with other devices, ensure that the Switch is prioritized. This can be done by assigning it a static IP address. You can do this by going into the System Settings from the HOME Menu, then selecting “Internet” and “Internet Settings.” Select “Connection Type” from here, then “Change Settings.”
Select your network from the “Connection Settings” menu and choose “IP Address Settings.” You can select “Static” from here and enter the IP address, subnet mask, default gateway, and DNS you want to use. After you’ve made your changes, select “OK” and then try to access the internet again.
4. Reboot the Networking Equipment
Rebooting means turning something off and then turning it back on again. In the case of networking equipment, this “something” is usually a router or modem. It is almost the same as restarting, but, in general, restarting refers to computer systems, while rebooting refers to devices.
- You need to unplug the power cord from the back of the router or modem. Wait until the lights on the device go out.
- Plug the power cord back into the router or modem, and wait until it turns on and all the lights are lit up.
- Once the router or modem is on, connect to the Internet again.
If you’re still having trouble connecting to the Internet after rebooting your router or modem, you can try resetting it. This will usually fix any problems you’re having.
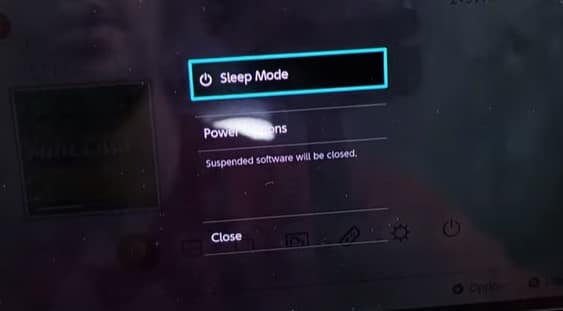
5. Restart Nintendo Switch
Sometimes a restart is all you need to fix an internet connection issue. A restart will close any open apps and reset any connection issues. Sleep mode does not close apps or reset internet connection issues. To restart your Nintendo Switch:
- Hold the power button for at least three seconds to restart your Switch. Select “Power Options” from the menu that appears and then select “Restart.”
- If your Switch is frozen and will not restart, press and hold the power button for twelve seconds to force it to shut down.
After a few minutes, power on the device again and try to see if it will be able to access and connect to the internet properly.
6. Change The Wireless Channel
If you are using a router, one thing you can try is changing the wireless channel. By default, most routers will operate on the 2.4GHz frequency band. However, this band can get crowded and cause interference from other devices, such as cordless phones, microwaves, and even your neighbor’s router.
To fix this, you can try changing the wireless channel on your router. This will help to minimize interference and optimize your wireless signal.
To change the wireless channel on your router:
- Log in to your router’s web interface. This is usually done by entering the router’s IP address in your web browser.
- Look for the wireless settings page and find the section for channel selection.
- Choose a different channel from the drop-down menu and save your changes.
- Reboot your router and try reconnecting to your internet again.
7. Use Switch Ethernet Adapter
You need to purchase a Switch Ethernet adapter to connect your Nintendo Switch to the internet. This small black dongle plugs into one of the USB ports on the side of the Switch.
Once you have this adapter, connect one end to your Switch and the other to an open Ethernet port on your router or modem.
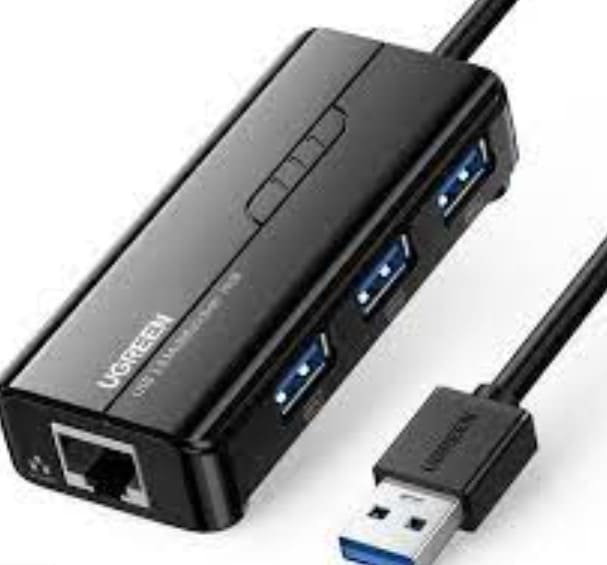
These adapters are available from the Nintendo Online Store or other retailers. If you are using a wired connection, we recommend plugging the adapter into the USB port on the back of the Switch dock for the best possible connection.
8. Performing Advanced Router Tweaks
You may be able to fix the problem by performing some advanced router tweaks. These tweaks include looking into advanced switch features, disabling your router’s firewall, or port forwarding.
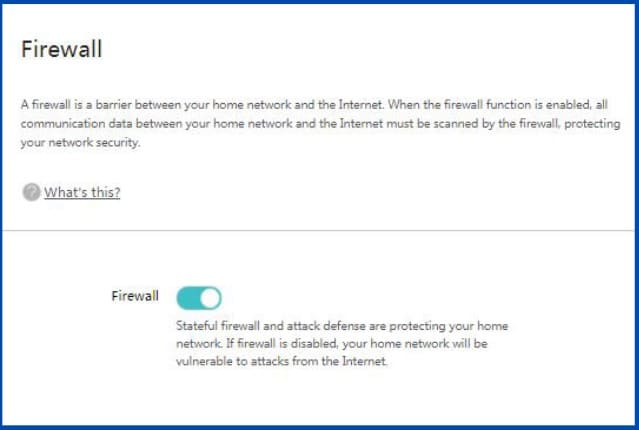
- Disabling Your Router’s Firewall
You can try to fix the problem by disabling your router’s firewall. This will allow all traffic to flow through the router without being blocked. To do this, you’ll require to access your router’s settings.
You can access this by opening your browser and typing your IP address. Once you are in the router’s settings, look for the firewall options and disable them.
- Port Forwarding
Port forwarding is a technique that can be used to improve gaming connections. It involves forwarding internet traffic to specific ports on your router. This can improve the connection between your Switch and the game servers.

To port forward, you will need to consult your router’s documentation. Each router’s process can differ, so it is important to consult your specific router’s documentation. Once you have found the port forwarding section of your router’s documentation, you will need to create a new rule.
This rule should forward traffic from the port that your Switch uses to access and connect to the internet (usually port 80 or port 443) to the IP address of your Switch.
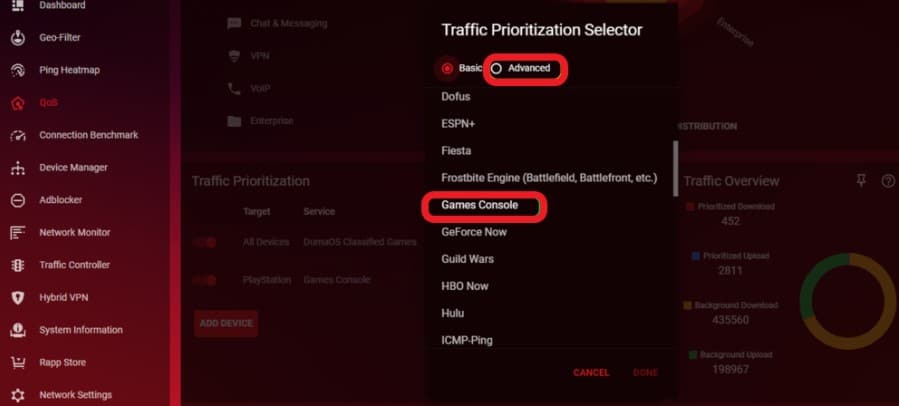
- Switch Advanced Features
If you have a gaming router, it likely has some advanced features that can help improve your Switch’s internet connection. One such feature is Quality of Service (QoS). QoS lets you prioritize gaming traffic over other types of internet traffic.
This can be helpful if you have a lot of devices connected to your router.
To enable QoS, you’ll require to access your router’s settings. This can usually be done by typing your router’s IP address on your web browser. Once you’re in the router’s settings, look for a QoS or Traffic Prioritization option. Enable this feature and follow the instructions to prioritize your Switch’s traffic.
9. Contact Nintendo Support
If you have tried all the above steps and your Switch still will not connect to the internet, you may need to contact Nintendo support for further assistance. You can reach out to them by phone or live chat. They will be able to help you troubleshoot the issue and get your Switch back online.
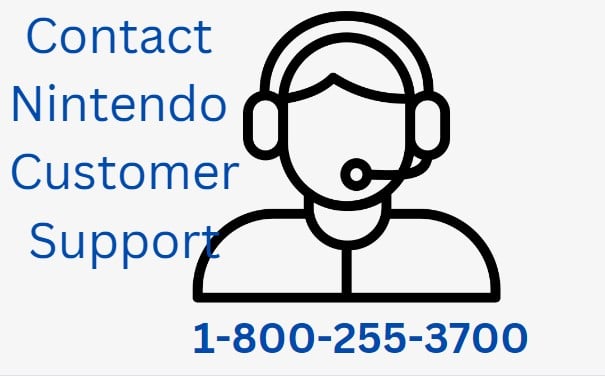
Try to be more specific when explaining your issue to them so that they can provide the best possible solution. Be sure to have your Switch serial number handy when you contact them. They may also ask you for your router’s model number and name.
Frequently Asked Questions
Does The Switch Have Good Battery Life?
The Switch has excellent battery life. It can last for several hours on a single charge, making it great for gaming on the go. When not in use, the Switch can be put into Sleep Mode to help conserve battery life.
What Is The Switch’s Controller Called?
The Switch’s controller is called the Joy-Con. It is a small, rectangular device that attaches to the Switch console via Bluetooth. The Joy-Con has a variety of input methods, including a touchscreen, motion controls, and physical buttons.
The Joy-Con can be used as a traditional gamepad or split into two smaller controllers that are used individually in each hand.
How Long Does Nintendo Switch Battery Last?
The battery life of the Nintendo Switch varies depending on the game you are playing. For example, The Legend of Zelda: Breath of the Wild can be played for about 3 hours on a single charge, while Splatoon 2 can be played for about 5 hours.
Of course, if you are playing a game that requires more power, like Witcher 3, you can expect the battery to drain more quickly.
To extend the battery life of your Switch, you can use the power-saving mode.
This mode will dim the screen and disable some features, but it will also help your Switch last longer on a single charge.
You should consider buying an external battery pack if you want the longest possible battery life. These battery packs can be plugged into the Switch and will provide extra power when needed. They are especially useful if you plan on playing games for long periods or if you need to be able to play while charging your Switch.
No matter how you choose to extend the battery life of your Switch, it would be best if you always had a charger handy. You can keep playing your favorite games without worrying about the battery running out.
How Much Does It Cost To Get A Nintendo Switch Battery Replaced?
The cost of replacing a Nintendo Switch battery will vary depending on your service provider. Generally, this repair will cost around $40 to $50. However, some service providers may charge a higher price for this type of repair.
Ensure to estimate the cost with your service provider ahead of time.
How To Check Nintendo Switch Battery Health?
After using any electronic device, it is primary to check the health of its battery. Batteries are one of the most important parts of our devices as they provide power. If the battery is not in good health, it can cause our devices to malfunction or even break down.
The same goes for the Nintendo Switch. You need to check the health of your Switch’s battery regularly to ensure that it is working properly.
To check the health of your Switch’s battery, you can use the built-in Battery Monitor feature.
To do this, follow these steps:
- Go to the Home Menu.
- Select “System Settings.”
- Then, scroll down to find “Settings.”
- Select “Console Battery (%).”
- This will show you the current battery level and the estimated time remaining.
Why Is My Switch Fan So Loud?
There are a few possible explanations for why your Switch fan might run loudly. It could be due to the console overheating, dust buildup preventing proper airflow or a failing fan.
If your Switch is overheating, you’ll need to take measures to cool it down and prevent it from happening again. This might involve using a cooling stand, placing the console in a well-ventilated area, or avoiding extended play sessions.
If dust is blocking the airflow around your Switch, you’ll need to clean it out. This can be done with compressed air, a vacuum cleaner, or a soft cloth. Be careful not to damage the console while cleaning it.
If the fan is failing, you’ll need to replace it. This is a more difficult repair that should be done by a professional.
Why Does My Switch Overheat?
Switch units are designed to dissipate heat through their metal casing. However, if the unit is not properly ventilated or placed in an enclosed area, the heat can build up and cause the unit to overheat.
This can make the unit uncomfortable to touch and can also cause the unit to malfunction.
If you have your Switch in an enclosed area, or if it is not getting enough airflow, you may consider moving it to a more open area. You can also try pointing a fan at the Switch to help keep it cool. If the unit continues to overheat, you may need a cooling stand or fan accessory specifically designed for the Switch.
Conclusion
Your switch may not be connecting to the internet for various reasons. The most common reason is that the switch is not properly configured. Sometimes, the problem may be with the router or the modem.
The above tips should help you fix the problem and connect your switch to the internet in no time. Try the above tips until you find the one that works for you.
If your Nintendo Switch is still not connecting to the internet, there may be a bigger problem. In this case, you should take your Switch to a professional for further diagnosis and repairs.


