

As a Mac user, you understand the significance of maintaining optimal performance on your device. One of the key ways to ensure this is by regularly freeing up memory on your Mac. I can’t emphasize enough how crucial this is.
An overloaded Mac can lead to slow performance, unexpected crashes, and a frustrating user experience. Plus, having extra space for those new apps or files you want to download is always nice.
Over time, our Macs can become cluttered with old files, unused applications, and accumulated cache that we don’t need. And let’s be honest, most of us are unaware of half the stuff eating up our disk space!
That’s why I’ve put together this guide to help you free up memory on your Mac. It’s easier than you think, and your Mac will thank you. So, buckle up and prepare to give your Mac a much-needed cleanup!
Let’s dive in.
What is Unified Memory?
With Apple’s shift to manufacturing its processors, the M1 and M2-series chips, the traditional concept of RAM has been replaced. Macs now come with Apple’s in-house silicon and utilize Unified Memory, a system where memory is distributed among all the hardware components.
In my experience with M1 and M2-series Macs, the memory isn’t a standalone component attached to the motherboard. Instead, it’s an inherent part of the chip’s architecture. This means there’s no separate memory slot or a fixed memory chip on the motherboard. The memory is built right into the same package where the chip resides.
This design choice has one major implication – you must decide on the right amount of memory when buying your Mac because it can’t be upgraded later. That’s why I found that my new M1 or M2 Mac potentially benefits from a cleaner app, something we’ll delve into later.
But Unified Memory does have its perks. Since the memory is accessible by both the CPU and GPU, it can be allocated as required, resulting in no performance loss. The transition between the two is immediate, eliminating the need for data duplication, thus making it instantly available. This leads to more efficient functioning and noticeable speed enhancements, which I’ve experienced.
Interestingly, due to this efficiency, 8GB of RAM in an M1 Mac doesn’t equate to 8GB of RAM in an Intel-based Mac. Still, I’d advise getting as much RAM as your budget allows when purchasing a new Mac – options range from 16GB to 128GB in the Mac Studio, which can be chosen at the time of purchase.
However, I’ve found that 8GB should be sufficient for regular use unless you’re running highly demanding apps.
Understand Your Disk Space
I was a little overwhelmed when I started trying to free up memory on my Mac. I mean, where do you even start? It felt like trying to clean out a garage full of stuff – some valuable, some not so much. But then I realized the first step is understanding what’s taking up all that space.
Your Mac’s hard drive is where everything is stored – your files, applications, system files, etc. When we talk about “freeing up memory,” we’re talking about making more room on this hard drive. We must understand what’s currently occupying our disk space to do this effectively.
Here are the steps:
- Click on the Apple icon in the top-left corner of my screen.
- Select ‘About This Mac.’
- When the window appears, click ‘More Info.’
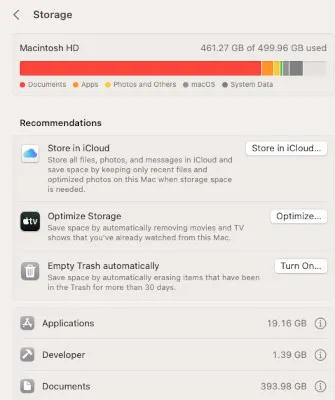
- On the right pane, scroll down until you see ‘Storage.’
- Under the Storage section, click ‘Storage Settings.’
- It’s divided into categories like ‘Applications,’ ‘Developer,’ ‘Documents,’ etc.
Now I could see which areas were hogging the most space. In my case, it was the ‘Documents’ category. For you, it might be something different.
Delete Unnecessary Files
Well, I started by going through my ‘Documents’ folder. I found old projects, outdated resumes, and random downloads I no longer needed. It was like a digital walk down memory lane, but it was time to let go.
Here’s the thing, though: you want to be careful when deleting files. Make sure you won’t need them in the future. If unsure, it might be best to back them up on an external drive or a cloud service before hitting delete.
Next, I moved on to my ‘Downloads’ folder. This is often a dumping ground for temporary files we forget to delete. I had PDFs of old plane tickets, installation files for apps I had already installed, and images I’d used once and never needed again. Into the trash, they went!
Then, I checked out my ‘Desktop.’ I’m not proud of it, but it was a bit of a mess. Screenshots, notes, and files that I’d saved there for quick access but never moved to their proper place. I sorted through them, trashed what I didn’t need, and organized the rest into appropriate folders.
Finally, don’t forget about your ‘Trash Bin.’ When you delete a file, it goes into the trash bin and stays there until you empty it. This means it’s still taking up space on your Mac. So, make sure you empty your trash bin regularly. Just right-click on the trash bin icon in your dock and select ‘Empty Trash.’
This process can be time-consuming, especially if you haven’t done it. But trust me, it’s worth it. Seeing all that newly freed-up space on my Mac was a fantastic feeling. Plus, my Mac seemed to run smoother and faster afterward – a bonus!
Clear Cache and Cookies
Now, I know what you’re thinking. “Cache and cookies? Aren’t those internet things? Why would they be taking up space on my Mac?” Well, let me explain.
Every time you visit a website, your browser saves bits of information from that site in your cache and cookies. This is done to make your browsing experience faster and more personalized. But these files can accumulate over time and take up quite a bit of space.
When I first learned this, I was surprised. I hadn’t realized my internet browsing habits could impact my Mac’s storage! But once I knew, I cleared my cache and cookies regularly. Here’s how I did it:
Safari Users
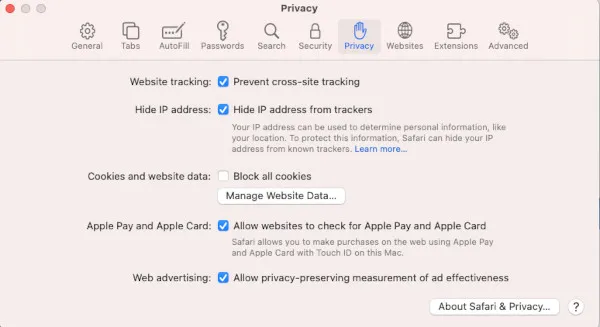
- Open Safari and click ‘Safari‘ in the menu at the top of your screen.
- Choose ‘Settings.’
- When the Settings window appears, click on the ‘Privacy‘ tab.
- Click ‘Manage Website Data.‘
- You’ll see a list of websites that have stored data on your browser.
- Click ‘Remove All‘ or select the websites you want to remove.
Chrome Users
- Open Chrome and click the three dots in the top-right corner of your screen.
- Select ‘Settings.’
- On the left sidebar, select ‘Privacy and security.‘
- On the right, select ‘Clear browsing data.‘
- A new window will pop up.
- Ensure ‘Cookies and other site data‘ and ‘Cached images and files‘ are selected.
- Click ‘Clear Data.’
Remember, clearing your cache and cookies will sign you out of most websites, so ensure you have any necessary passwords. Also, your browsing might be a bit slower initially, as sites must rebuild their cache.
This might seem small, but it can free up considerable space. Plus, it can help protect your privacy by removing tracking cookies from your Mac. So, it’s a win-win in my book.
Uninstall Unneeded Applications
The next step in my journey to free up space on my Mac was to uninstall unneeded applications. This might sound a bit daunting, but it’s pretty straightforward.
First, I opened the ‘Applications’ folder on my Mac. I was surprised by how many apps I had installed! Some of them, I didn’t even remember downloading. Others I hadn’t used in months or even years. It was clear that it was time for a clean-up.
Now, here’s the thing about uninstalling apps on a Mac. You can’t just move the app to the Trash Bin. That leaves behind all sorts of leftover files and folders that continue to take up space on your hard drive. Instead, you need to uninstall the app properly.
So, how did I do this? Well, I used a built-in tool on my Mac called ‘Launchpad.’ Here’s how it works:
- Open ‘Launchpad‘ (you can find it in your Dock or by doing a Spotlight search).
- Find the app you want to delete.
- Click and hold on the app until it jiggles (like on an iPhone or iPad).
- Click the ‘X‘ that appears in the app’s top-left corner.
- Confirm that you want to delete the app.
This process uninstalls the app and all its associated files, freeing up all that valuable space on your hard drive.
Of course, be mindful of what you’re uninstalling. Make sure it’s not something you’ll need later. If you’re unsure, do a quick Google search to see what the app does before you get rid of it.
After uninstalling unneeded apps, I felt like I’d done a major spring cleaning on my Mac. It was lighter, faster, and had so much more free space. Plus, finding the apps I use among the clutter was easier. Trust me, it’s a satisfying feeling.
Use Cloud Storage
When I first heard about it, I was a bit skeptical. But after using it, I can confidently say it’s a game changer, especially when freeing up space on my Mac.
So, what did I do? Well, I started by uploading my files to a cloud storage service. I chose iCloud because it’s built into every Mac and offers 5GB of free storage. Plus, it’s super easy to use. Here’s how:
- On the Dock, click ‘System Settings.’
- On the left sidebar, click on ‘Apple ID.‘
- If you’re not already signed in, do so with your Apple ID.
- Select ‘iCloud‘ on the right and check ‘iCloud Drive.’
- Ensure ‘Sync this Mac’ is enabled.
But here’s the trick: I didn’t just upload my files to iCloud. I also set it up so that my Mac keeps only recently opened files on the computer, and older files are stored in iCloud. That way, they’re still there if I need them, but they’re not taking up space on my hard drive.
To set this up, follow these steps:
- Go to ‘System Settings.’
- On the left sidebar, click on ‘Apple ID.‘
- If you’re not already signed in, do so with your Apple ID.
- Check the box next to ‘Optimize Mac Storage.’
Now, iCloud isn’t the only option. Other great cloud storage services like Google Drive, Dropbox, and OneDrive exist. They all work similarly – you upload your files to the cloud, and then you can access them from any device with an internet connection.
Of course, you’ll want to be mindful of your cloud storage limit. If you have a lot of files, you might need to pay for additional storage. But in my experience, the cost is worth the space it frees up on my Mac.
Using cloud storage has been a huge help in my quest to free up space on my Mac. I no longer worry about running out of storage or losing my files, and my Mac runs much smoother.
Empty the Trash Bin
Now, let’s discuss one of the most satisfying yet overlooked steps when freeing up space on a Mac: emptying the trash bin. I know, I know, it sounds so simple, right? But you’d be surprised how often this step is forgotten and how much space you can recover by doing it.
Here’s the thing about the trash bin on your Mac: when you move a file or an app to the trash, it’s not gone. It’s just sitting in the Trash Bin, taking up space on your hard drive until you permanently delete it. I was guilty of this, too. I’d send things to the trash and then forget all about them. Then, one day, I opened my trash bin and realized it was full of old files I no longer needed.

So, I made it a habit to empty my trash bin regularly. Here’s how you do it:
- Find the Trash Bin icon in your Dock (it looks like a waste bin).
- Click on it to open it.
- In the window’s top right corner, click ‘Empty.’
- A warning will pop up asking if you want to erase the items in your trash permanently.
- Click ‘Empty Trash.’
And voila! All those old, unnecessary files are gone, and you’ve freed up much space on your hard drive.
It’s important to remember that once you empty the trash, those files are gone for good. So, ensure there’s nothing in there that you might need later. If you’re unsure, it’s worth taking a few minutes to review your trash before emptying it.
Emptying the trash bin is a simple step, but it has a big impact. Plus, there’s something deeply satisfying about clicking that ‘Empty’ button and knowing you’re making your Mac cleaner and more efficient. Give it a try, and see how much space you can free up.
Use a Third-Party Cleaning App
Now, I know what you’re thinking – why use a cleaning app when I’ve done all this manual cleaning? Well, as thorough as I tried to be, hidden junk files still lurked in the depths of my hard drive. That’s where the cleaning app came in.
There are several good options out there, but I decided to go with CleanMyMac X. It came highly recommended by several tech websites, and I can see why after using it. This little tool is like a vacuum cleaner for your Mac. It scans your hard drive and identifies all the hidden junk files taking up space – things like old cache files, broken downloads, and system logs.
Here’s how I used it:
- Download and install CleanMyMac X (it’s free to download, although some features require a paid upgrade).
- Open the app and click ‘Smart Scan‘ on the left sidebar.
- Click ‘Scan‘ and let the app do its thing.
The scan took a few minutes, and when it was done, I was shocked at how much junk it found! There were gigabytes of unnecessary files on my hard drive. With a single click on ‘Clean,’ CleanMyMac X got rid of them all.
Now, I should note that while I used CleanMyMac X, other great cleaning apps exist, like DaisyDisk and OnyX. They all work slightly differently, but with the same result: they help you identify and remove unnecessary files, freeing up space on your hard drive.
Using a third-party cleaning app was the cherry on my Mac-cleaning sundae. It found and deleted files I didn’t know were there, making my Mac run smoother and faster. I highly recommend trying it, especially if you’ve done all the other steps and need to free up more space.
Conclusion
Freeing up space on my Mac wasn’t as daunting as I initially thought. I started by identifying and removing unneeded applications, then moved my files to cloud storage, regularly emptied my trash bin, and finally, used a third-party cleaning app for a deep clean.
Each step was fairly straightforward, and the benefits have been significant. My Mac is running smoother and faster, I have more space for new files and applications, and I’ve even noticed an improvement in its overall performance.
It’s amazing how such simple steps can make such a big difference. If you’re struggling with a slow or full Mac, I encourage you to try these steps. You might be surprised at how much space you can free up and how much better your Mac can perform.
Remember, your computer is like a digital home. It needs regular cleaning and decluttering to stay in good shape. So, make it a habit to regularly check your storage, remove unnecessary files, and keep your system clean. Trust me, your Mac will thank you!


