

Nowadays, communication is mainly done via text messages. Android phones have made this possible by bringing a messaging app to send and receive text messages. However, sometimes when you try to send a text message, you may get an error message that says, “Message Not Sent – Invalid Destination Address.”
This can be frustrating, especially if you’re trying to send an important message. A recent update in Android Messages caused these bugs. You need to know how to fix this problem to continue sending text messages without issues.
What Does Message Not Sent Invalid Destination Address Mean?
You may get a “message not sent – invalid destination address” error when sending a text message. The error means the text message could not be sent because the recipient’s phone number was entered incorrectly.

The reasons for this error could be:
- The phone number was entered incorrectly. Make sure you have the correct phone number for the recipient.
- The recipient’s phone may be turned off or out of service. Try sending the text message later.
- The recipient may have blocked text messages from your phone number.
- Your phone may be unable to send text messages to the recipient’s phone carrier.
Best Ways To Fix Message Not Sent Invalid Destination Address
The error message “Message Not Sent – Invalid Destination Address” means that the number you are trying to send a text message to is not a valid cell phone number. There are a few ways to fix this problem to successfully send your text message.
1. Make Sure Your SMS Plan Is Active
You need an active SMS plan with your wireless carrier to send an SMS text message. When your SMS plan is not active, you cannot send text messages. Most of the time, your monthly wireless plan includes the charges for sending text messages.
However, if you have a pay-as-you-go plan, you may need to purchase credits to send text messages. This problem is caused by a lack of credit on your account. To check if your SMS plan is active, contact your wireless carrier. The balance of your SMS plan can also be checked by logging into your carrier’s website.
If your SMS plan is inactive, you must activate it before continuing.
2. Force Stop The Message App
Your message app may not work properly, so you’re getting the “Message Not Sent – Invalid Destination Address” error message. To fix this, you need to force stop and restart the app.
To do this, follow these steps:
- Go to Settings > Apps & notifications.
- When you see all the apps, go to Message > Force Stop.
- Once the app is force stopped, restart your phone and send the text message again.
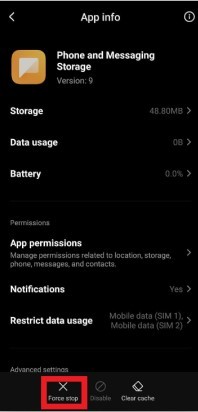
After you force-stop the app, launch it again and try to send the message. You may need to clear the app’s data if it doesn’t work.
3. Turn ON/Off The Airplane Mode
A glitch from your Android phone’s network or an invalid destination address could be why your texts are stuck as “message not sent.” The best way to fix this problem is by toggling ON and OFF the airplane mode. This will reset your phone’s network connection and hopefully fix the problem.

To do so, follow these steps:
- Go to your phone’s settings.
- Tap on the “Wireless and Networks” option.
- Find and tap on the “Airplane Mode” option.
- Toggle the switch to ON.
- Wait for a few seconds and toggle the switch back to OFF.
4. Clear Cache And Data Of The Messaging App
Your phone’s cache memory is a storage component that holds temporary data. This cache memory can corrupt and cause problems with your phone’s messaging app. Clearing the cache and data of the app can often fix these issues.
To clear the cache and data of your messaging app, follow these steps:
- Open the Settings app on your phone and tap “Apps.”
- Tap the messaging app you’re using, then tap “Storage.”
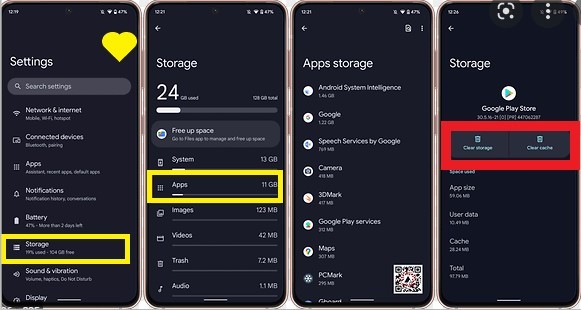
- Tap “Clear Cache” and tap “Clear Data.”
- Restart your phone, then try sending a text message.
- If you’re still having problems, you may need to uninstall and reinstall the app.
5. Enable The Permission For SMS App
When the SMS app cannot send messages, you will get the error “Message Not Sent Invalid Destination Address.” To fix this problem, you must enable permission for the SMS app.
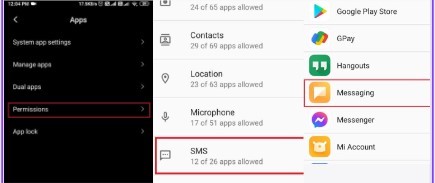
To do this, follow these steps:
- Go to “Settings > Apps.”
- Find the SMS app from the list.
- Tap on the app and enable the “Send SMS” permission.
6. Restart Your Device
Any unsent text messages will be sent automatically when you restart your device. This is a good way to fix the problem if a software glitch causes it. This process ensures that all the unsent messages are sent and any pending operations are completed.
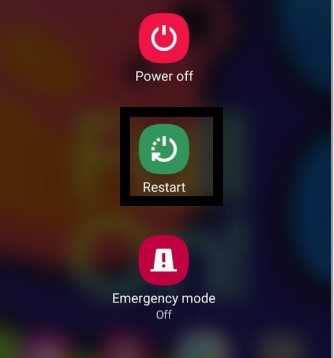
To restart your device, turn it off and back on again. Or you can also reboot your device by holding the power button for a few seconds.
7. Check The Receiver’s Number
Sometimes we may inadvertently add a space before the contact number or mistype the digits. These small mistakes can result in a message not sent error. So, check if you have entered the correct number to send the message.
To avoid such errors, you must type the number manually rather than selecting it from the contact list.
8. Update The Messaging App
Out-of-date messaging apps can cause various problems, including the “invalid destination address” error. To check for updates, open the app store on your device and search for the app. If an update is available, tap Update.
The updates allow the messaging app to work with the latest Android version and security patches. This will restore the app to optimal functioning and may fix the “invalid destination address” error.

9. Factory Reset Your Android Phone
Generally, a factory reset should be your last resort when fixing any problem on your Android device. This is because it will erase all the data on your device, including your apps, settings, and files. So, if you haven’t tried other methods, you can try this one.
But make sure to back up your data first before proceeding.
To return your device to its original settings, follow these steps:
- Go to Settings > Backup & Reset > Factory Data Reset.
- Tap on the Reset Device button and confirm your action.
- Your device will now restart, and all your data will be erased.
10. Get Help From Customer Support
If you’re having trouble with any of the troubleshooting steps outlined in this guide or need additional assistance with your phone connection, don’t hesitate to contact Verizon support.
Their expert team can provide more detailed instructions and fixes after you describe the issue and what you’ve already tried to fix it. You might even receive complimentary upgrades as an apology for any inconvenience caused.
11. Check If SIM Card Is Valid
A SIM card is required to use cellular data on your phone. If you’re getting the message not sent error, it could be because your SIM card is invalid. You can check your SIM card status by going to Settings > Cellular. If you see “Invalid SIM” next to your carrier, your SIM card is no longer active.
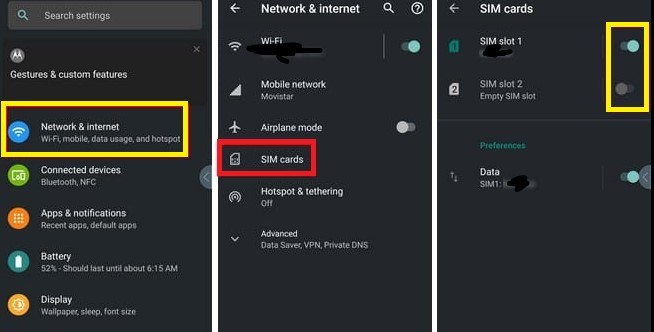
You can try to fix this problem by purchasing a new SIM card. To get a replacement SIM card, visit your nearest Verizon store or an authorized retailer. Their knowledgeable staff can assist with the replacement and diagnosis of any issues you’re experiencing.
In most cases, this process takes less than an hour, meaning you can quickly back up and running with a brand-new SIM card.
12. Update Your Carrier Settings
Your carrier settings may be outdated, causing the message not sent error.
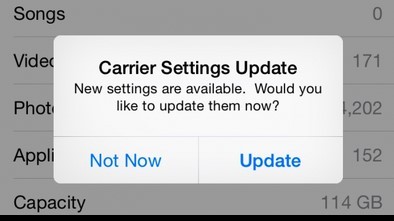
To update your carrier settings, follow these steps:
- Go to Settings > General > About.
- You’ll see a prompt to update your carrier settings if an update is available.
- Follow the on-screen instructions and restart your phone when prompted.
How Do I Fix My T-Mobile Phone’s “No Service” Error?
You can often fix the “No Service” error on your T-Mobile phone by restarting it. You may need to select a new network provider if that doesn’t work.
To do this, follow these steps:
- Go to Settings > Cellular > Network Providers.
- Select a new provider.
- If you’re still having trouble, you may need to contact T-Mobile customer service for further assistance.
Why Can’t I Log Into The T-Mobile App?
Logging in to the T-Mobile app should be a simple process, but sometimes there can be issues. If you have trouble logging in, here are a few things to check:
- Make sure you’re using the correct username and password. If you’ve forgotten your password, you can reset it by going to the T-Mobile website and clicking “Forgot Password?”
- Make sure you have a strong internet connection. If you’re on a cellular data connection, try switching to Wi-Fi.
- Make sure you have the latest version of the T-Mobile app. You can check for updates in the App Store or Google Play Store.
How Do I Clear My T-Mobile App?
You can try clearing your T-Mobile app data if you still have trouble logging in. This will reset the app and may fix the problem.
Here’s how to do it:
- Go to Settings on your Android device.
- Tap Apps & notifications > App info.
- Tap See all apps > T-Mobile > Storage.
- Tap Clear data.
- Once the data is cleared, try logging in to the app again.
If you’re still having trouble, try uninstalling and reinstalling the T-Mobile app. This will delete all of the app’s data, so you’ll need to log in again.
Here’s how to do it:
- Go to Settings on your Android device.
- Tap Apps & notifications > App info.
- Tap See all apps > T-Mobile.
- Tap Uninstall.
- Once the app is uninstalled, go to the Google Play Store and download the T-Mobile app again.
- Try logging in to the app.
How To Get Rid Of T-Mobile Update Service Notification?
If you’re getting the T Mobile update service notification, an update is available for your phone. This isn’t necessarily bad, but it can be a nuisance if you’re not expecting it.
The best way to get rid of the T Mobile update service notification is to update your phone. This will solve the problem; you won’t have to see the notification again.
To do this, follow these steps:
- Go to Settings > About Phone > System Updates to update your phone.
- Tap the “Check for Updates” button and follow the prompts.
- Once your phone is updated, the T Mobile update service notification should go away.
Frequently Asked Questions
Why Does T-Mobile Keeps Stopping Keep Popping Up?
There are a few reasons why this message may keep appearing on your screen. One reason could be that you have a weak or unstable connection to the network. This could be due to your location or that T-Mobile’s network is experiencing issues in your area.
Another reason this message may appear is if you have an outdated or incompatible version of the T-Mobile app installed on your device. To fix this, update the app to the latest version.
Finally, this message may also appear if there is a problem with your SIM card. If this is the case, you will need to contact T-Mobile customer support for further assistance.
How Do I Fix My T-Mobile App Not Working?
If your T-Mobile app isn’t working, there are a few things you can do to try and fix the issue. First, ensure you have the latest version of the app installed on your device. If you don’t, try updating the app and see if that fixes the problem.
If the program isn’t working, try turning off your device and restarting it. This may aid in removing any problems that are causing the software to fail.
Why Does T-Mobile Keeps Downloading Apps?
When using your T-Mobile phone, you may notice that it periodically downloads apps without your permission. This can be frustrating, especially if you’re unsure why it’s happening. You may wonder why your phone keeps downloading apps and how to stop it.
There are a few reasons your T-Mobile phone may keep downloading apps. One possibility is that you have an app configured to update itself automatically. This can happen if you have set your app to update automatically in the Play Store or another app store.
Another possibility is that you have an app configured to check for updates regularly. This can happen if you have an app that relies on a regularly updated service, such as a weather app that checks for new forecast data.
Why Won’t T-Mobile Notifications Go Away?
If you’ve ever seen a notification on your T-Mobile phone that won’t go away, even after you’ve tried to clear it, you’re not alone. This is a common problem with T-Mobile phones; you can do a few things to fix it. You may need to try multiple methods to eliminate the persistent notification.
You can try to go into the Settings menu on your phone and look for the Notifications section. You should see an option to turn off notifications for specific apps. If you find the app causing the problem, you can turn off its notifications, which may fix the issue.
How Do I Clear My T-Mobile Notifications?
If you’re wondering how to clear T-Mobile notifications, here’s the lowdown. Go to Settings > Notifications. You can select which apps you want to receive notifications from and how you want to be notified. You can also turn off notifications entirely by tapping the switch at the top of the screen.
To clear individual notifications, swipe left and tap the trash can icon. To clear all notifications, tap the three dots in the upper right corner and select “Clear all.”
Conclusion
While you may be anxious to fix the “Message Not Sent Invalid Destination Address” error, it is important to remember that the above steps serve as a guide.
There is no one-size-fits-all solution to this problem, so you’ll need to experiment with a few different methods before finding the one that works best for you.


