

The Internet is essential to our lives, but sometimes things can go wrong. It’s important to ensure that your PC has a valid IP address to connect well with the web and other devices in this vast digital world we call home.
Suppose there are issues with getting this crucial feature on your system working smoothly. In that case, Ethernet Doesn’t Have A Valid IP Configuration error will appear instead of loading the content as normal.
This blog post will explore and give solutions to common problems with “Ethernet doesn’t have a valid IP configuration.”
What are the possible solutions to solve this error?
How to Fix Ethernet Doesn’t Have A Valid IP Configuration
Solution 1: Restart Your PC, Modem, and Router
Sometimes, the issue can be fixed by simply restarting the affected hardware. You need to save all your work before restarting your PC.
- Click on the Windows icon and open the Start menu.
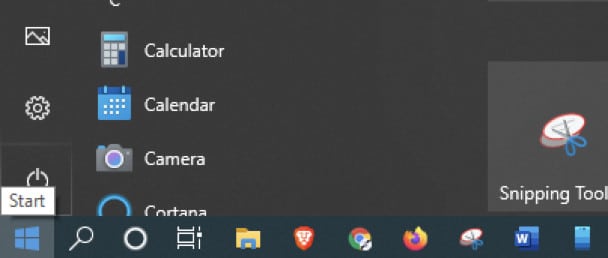
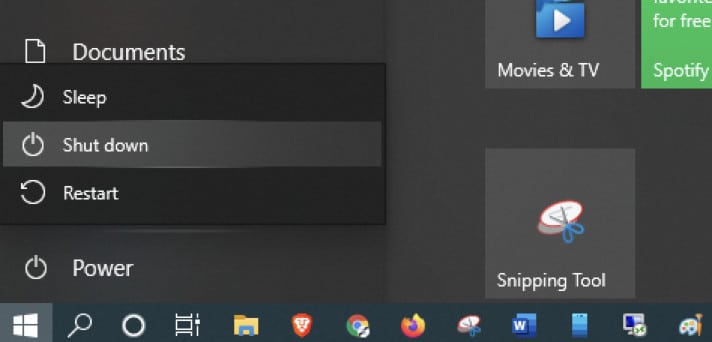
- Click on the Settings icon and select the Power icon. Proceed and select the Restart option. Your PC will shut down and restart by itself.
- Log back into your Windows 10.
The next thing you need to do is restart your modem or router. Here is how you can do that:
- It would help if you started by unplugging the modem or router device. Leave it for around five minutes. That allows it for a proper restart.
- You should then plug it back in and wait for it to start. Once the LED lights start showing, that will mean that the device has been powered back and is ready for operation.
- Next, you need to check if the error has been fixed on your PC. Ensure you’ve checked the Ethernet cable you are using and verified that it is alright. You can test the connection with another cable and confirm whether the issue is about the cable.
Solution 2: Disable the Fast Startup Feature
You can try solving this error by disabling the Fast Startup feature. This feature comes by default for the majority of Windows 10. Its role is to allow the PC to recover quickly from shutdown or hibernation, allowing it to boot up quickly.
To turn off this feature, you should follow these steps:
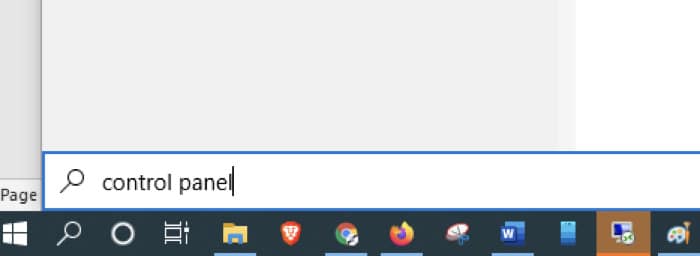
- Under the Search bar, type Control Panel and launch it.
- Under the Control Panel, select the Power Options.

- Select the Choose what the power buttons do link on the window’s left side.

- Proceed and select Change settings that are currently unavailable link. You will be required to enter the Administrator password.
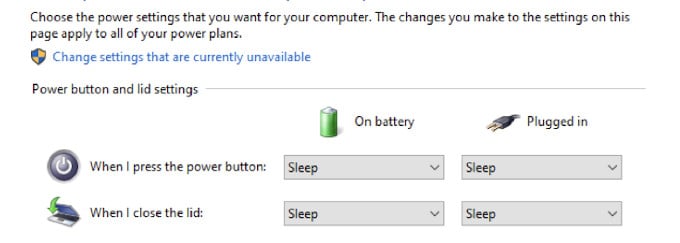
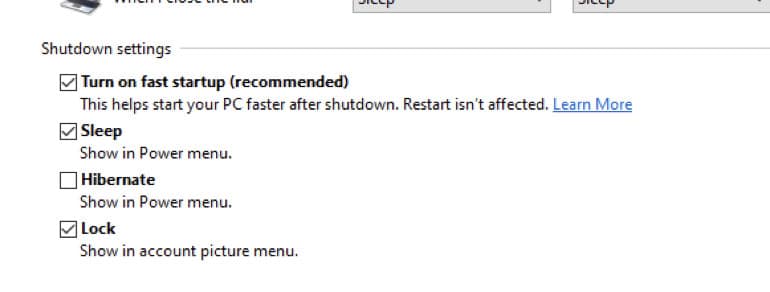
- Proceed and uncheck the box Turn on fast startup (recommended) option under the Shutdown setting to turn off the feature and then click on Save changes. Doing this will disable the feature once and for all and maybe solve the issues related to your Ethernet connection.
- Then select Save changes icon and restart your PC. Once you’ve restarted your PC, you should confirm whether the problem is resolved.
Solution 3: Configure the Network Adapter Settings
You need to know that an IP address automatically assigns a router to each connected device. However, you can configure this setting by assigning it one static IP address.
To configure your network adapter settings, you should do the following:
- Hit the Windows + R key to bring up the Run feature. Then enter ncpa.cpl text and click Ok. What this will do is open up the Network Connections window.
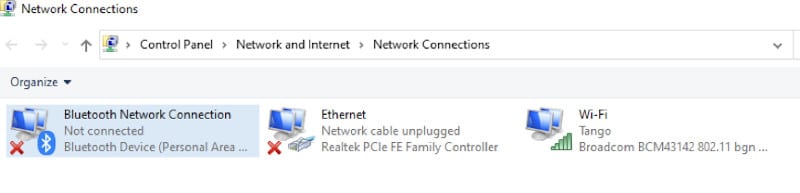
- Proceed and click on the Ethernet adapter settings and choose the Properties option.
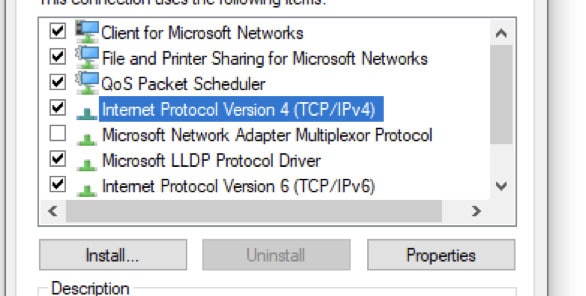
- Once you reach the Ethernet properties dialogue box, check out Internet protocol version 4 (TCP/IPv4) and double-click on it.
- You will be redirected to the properties of the Internet protocol version 4 (TCP/IPv4). Once you get there, you will have the following options that you will be required to enable: Obtain an IP address automatically and Obtain DNS server address automatically.
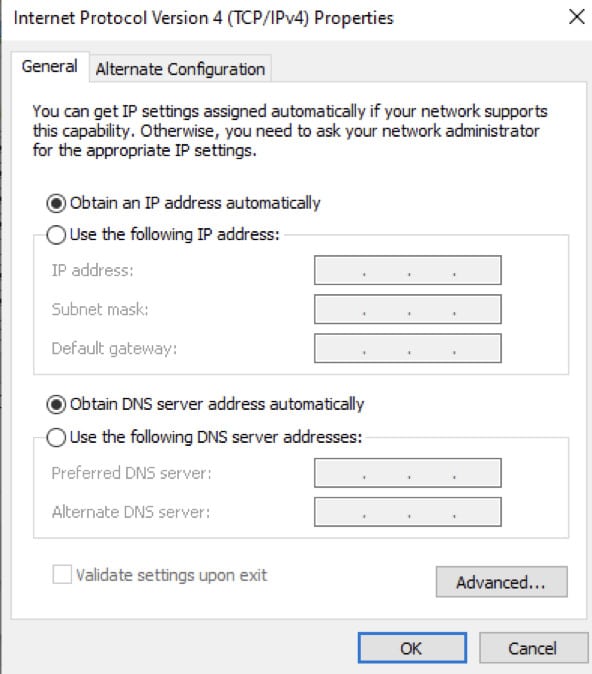
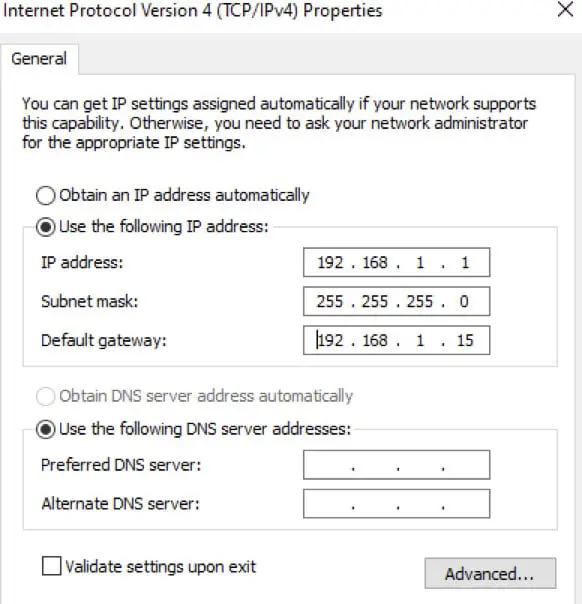
- If the error is still popping up after doing all that, you can proceed and set your DNS and IP address manually. To do so, follow the previous steps and select and edit these options on the Internet Protocol Version 4 (TCP/IPv4) Properties.
- Try using the following IP address and fill in the details with the following numbers:
- Default gateway: 192.168.1.1
- Subnet mask: 255.255.255.0
- IP address: 192.168.1.15
- Try using the following IP address and fill in the details with the following numbers:
- The next thing you need to do is use the following DNS server address and then fill in the details with the following numbers:
- Alternate DNS Server: 8.8.4.4
- Preferred DNS Server: 8.8.8.8
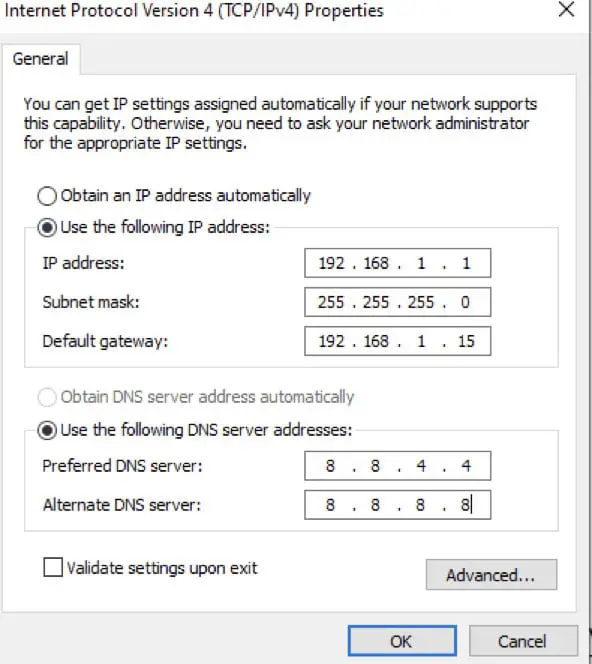
After completing that, click on OK to save the changes you have made. You need to know that these are Google’s DNS settings.
Related: Fix: Feature Update to Windows 10, Version 1903 – Error 0xc1900223
Solution 4: Reset TCP/IP
For this method, you must use the Command Prompt option and the netsh command. Doing this enables you to modify or display the network configuration settings of your PC.
To reset the TCP/IP, you need to do the following:
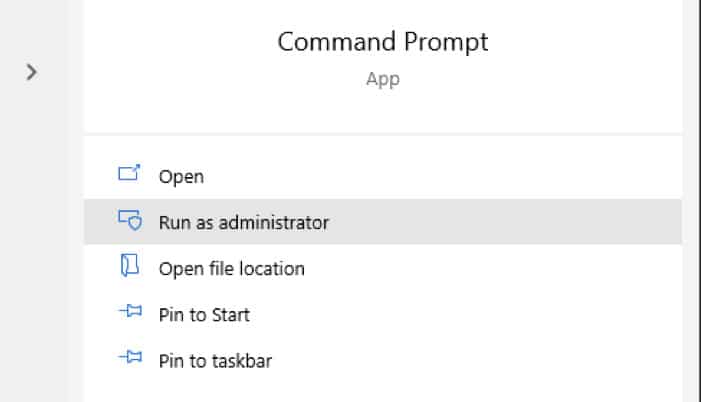
- Begin by typing in the Command Prompt under the Search icon. You can do that by hitting the Windows + S key.
- Proceed and right-click on the Run as Administrator option to open the elevated command prompt. You can also right-click the Command Prompt icon and select Run as Administrator. You need to click OK when it asks for permission.

- You need to click Yes and allow the application to make changes on the device if prompted by the user account control (UAC). It is needed to enable the launching of the software.
- Once on the elevated Command Prompt, please type the following commands and then hit the enter button key to execute them properly.
- netsh winsock
- Reset netch int IP reset
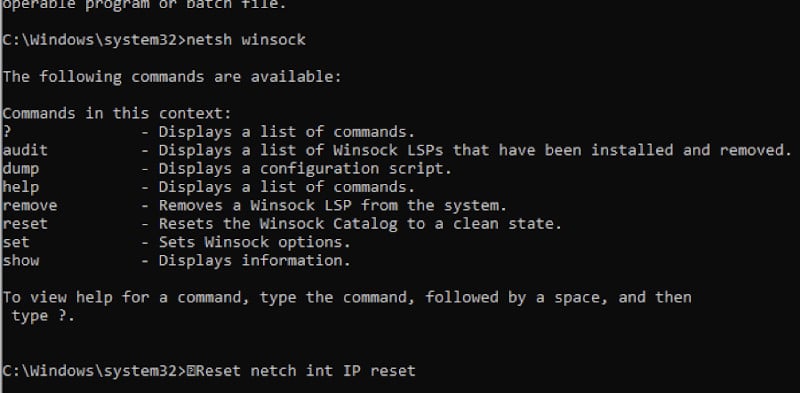
- Once you run the first command, you will receive a message requiring you to restart your PC. Ignore it and proceed to run the second command.
- Once both commands have run successfully, consider restarting the PC and checking if the error has been fixed.
Solution 5: Clear the Network Cache
For this method, you will use the ipconfig command in the elevated command prompt. What this command does is that it displays the current configuration that has been installed on the IP stack. The advantage of using it is that it allows you to reset all the contents of the DNS client resolver cache and renew the DHCP configuration.
- First, hit the Windows + S key to prompt the Search icon.
- Proceed and click on Run as Administrator to open up the elevated command prompt option. Alternatively, you can right-click on the Command Prompt icon and proceed to click on Run as Administrator. If it asks for permission, click OK and proceed.
- Under the elevated command prompt option, type the following commands:
ipconfig /renew
ipconfig /flushdns
ipconfig /release
After entering these commands, you should reboot your PC and check if the error has been fixed.
Solution 6: Reinstall/Update Your Network Adapter Driver
This is another method that can help you solve the issue of the “Ethernet doesn’t have a valid IP configuration” error. You can update or reinstall the network adapter driver using the device manager.
Here is what you have to do:
- To start, type Device Manager on the search icon or press the Windows + S to prompt the search bar. Alternatively, you can hit the Windows + R key, type hdwwiz.cpl, and click OK.

- You will be redirected to the Device Manager where you will have access to the list of devices connected to your PC. Check out for Network Adapters, expand it, right-click on the device, and then uninstall it.
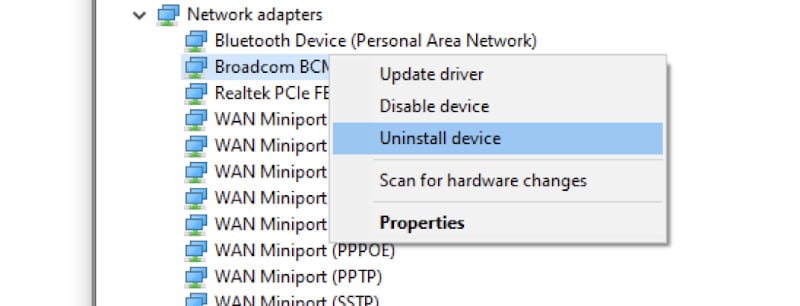
- Once you get here, you will receive a confirmation dialog box. You need to click Uninstall. You should then check the box that has Delete the driver software for this device once it pops up.
- The next thing you need to do is restart your computer and confirm whether the error is gone.
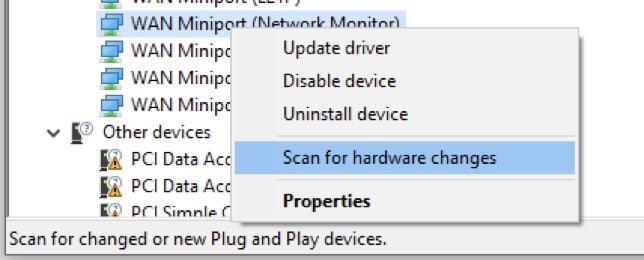
- If Windows fails to install the uninstalled drivers, you should head back to the Device Manager, right-click on your computer’s name, and then click Scan for hardware changes. This will automatically detect the missing drivers and then install them automatically.
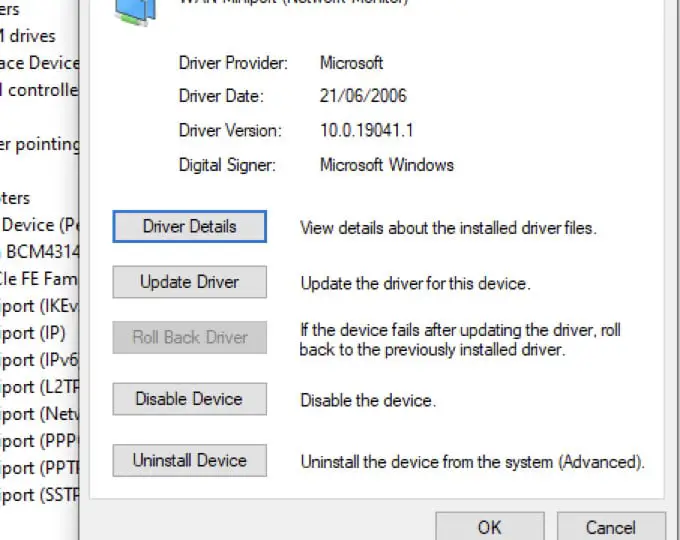
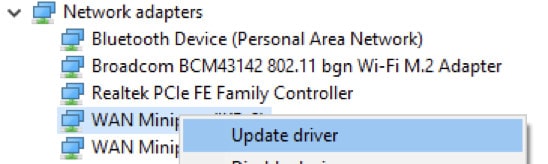
- To update the drivers, you can follow the steps discussed earlier but rather than select the Uninstall option; you will choose the Update Drivers option.
After doing this, you will be prompted to a window. It will ask if you are searching for the updated driver software automatically or manually. By choosing the first option, your PC will go for the latest driver software for the device.
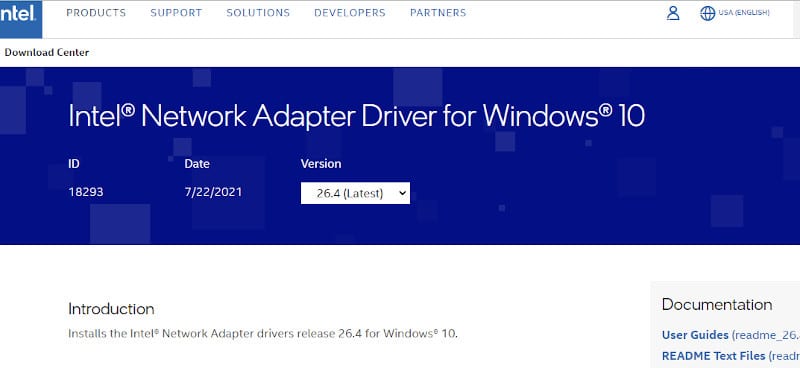
If you choose the second option, you must manually locate and install the drivers. That option requires you to have already downloaded the drivers. If the first option fails to solve the issue by any chance, you should download the latest network adapter drivers from the manufacturer’s website.
Solution 7: Disable Microsoft Kernel Debug Network Adapter
Many users have complained that they have observed unknown network devices appearing in their Device Manager. These devices can devastate your Internet connection and may end up causing the error “Ethernet doesn’t have a valid IP configuration” to pop up.
To solve this issue, you must locate and eliminate the unknown network adapters from the Device Manager.
Here are the steps you need to follow:
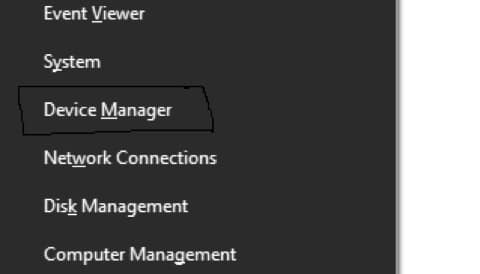
- Hit the Windows + X key and select Device Manager from the list.
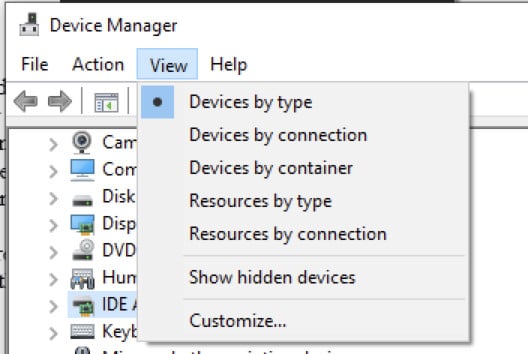
- Once the Device Manager opens up, you will proceed to the View and check the Show hidden devices part.
- Proceed and locate the Microsoft kernel debug network adapter under the Network adapters section. Proceed and right-click the adapter, then choose the Disable device option from the menu.
- You will receive a confirmation message that requires you to accept the option of disabling the adapter. Click Yes and accept to disable the adapter.
After disabling the Microsoft kernel debug network adapter, confirm if the error message still pops up.
Solution 8: Disable the Antivirus
In some cases, the antivirus software may interfere with the network connection and result in this error. The only solution to this problem is to try to disable several settings in your antivirus and confirm if the error is resolved.
If that fails to work, you should proceed and disable it completely. Some more complex cases exist where disabling the antivirus fails to fix the error. In such a case, you need to uninstall the antivirus software entirely.
The error should be gone once you’ve uninstalled the antivirus software completely. You should proceed and install the latest version of the antivirus. You can also get a completely different antivirus solution.
Solution 9: Disable QoS on Your Router
In case you are getting the error “Ethernet doesn’t have a valid IP configuration” regularly, the reason could be due to your router’s configuration. Many users have come out and claimed that the QoS feature is the source of this error.
To resolve this problem, open your router’s settings and disable QoS.
Remember that not all routers come with this feature. With that in mind, before you go ahead and make any alterations, you need to check your router’s instruction manual.
Solution 10: Connect Your Powerline Adapter to a Different Outlet
This method works for users of powerline adapters. If the error “Ethernet doesn’t have a valid IP configuration” is still popping up, here is what you can do.
Try connecting it to a different power outlet and confirm if the issue resolves. Some users confirmed that connecting the adapter to a different power outlet resolved this issue. You can also try it and see if it works.
Conclusion
The “Ethernet doesn’t have a valid IP configuration” error can be extremely annoying. The methods discussed in this article will help you resolve this error once and for all.


