

If you’re a Windows 10 user, you may have noticed that the Windows + Shift + S shortcut doesn’t seem to work anymore. This is because Microsoft has recently changed how this shortcut works in the latest update to the operating system.
If you have trouble getting the Windows + Shift + S hotkey to work in Windows 10, here are some best solutions. “Windows + Shift + S not working in Windows 10” is a common issue that many people are experiencing.
In this article, we will show you how to fix the problem. We’ll also provide some tips on how to avoid it in the future.
What is Windows + Shift + S Not Working?
There are a few possible reasons why Windows + Shift + S may not work in Windows 10. One possibility is that the keyboard shortcut has been disabled. Another possibility is that the Snipping Tool may have been accidentally uninstalled or blocked.
A third possibility is that there may be a problem with your graphics card or with the drivers for your graphics card. Finally, it’s also possible that there may be a problem with the Snipping Tool itself.
How to Fix Windows + Shift + S Not Working?
If you come across this error, there are 5 potential solutions listed below to help fix this issue.
Method 1: Reset the Snip & Sketch Tool
Are you having trouble with the Snip & Sketch Tool in Windows 10? If the Windows + Shift + S shortcut isn’t working, don’t worry – there’s an easy fix. Just reset the tool, and you’ll be up and running quickly.
Here’s how to do it:
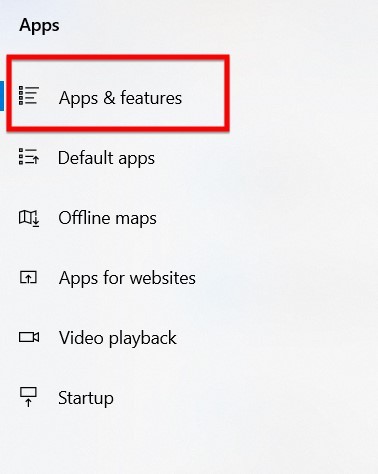
- Open the PC Settings by pressing the Windows+I button and going to the “Apps” tab.

- Select “Apps & Features” from the menu on the left.
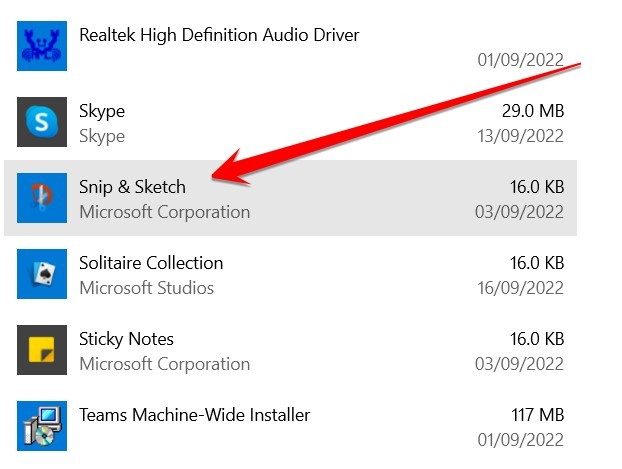
- Scroll down to find the “Snip & Sketch” app, click on it, and then click on the Advance option.
- In the Advance section, scroll down, click the “Reset” button, and confirm that you want to reset the app.
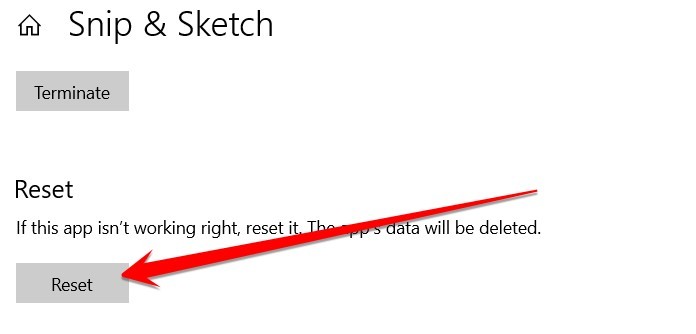
That’s all there is to it! Resetting the Snip & Sketch Tool should fix the Windows + Shift + S shortcut issue. If you’re still having trouble, follow the second method below.
Method 2: Enable the Clipboard History
Enable Clipboard History to Fix Windows + Shift + S Not Working in Windows 10. If you’re running into issues with the Windows + Shift + S shortcut not working properly, it’s likely because your clipboard history is disabled.
Here is how to enable clipboard history and get everything back to normal:
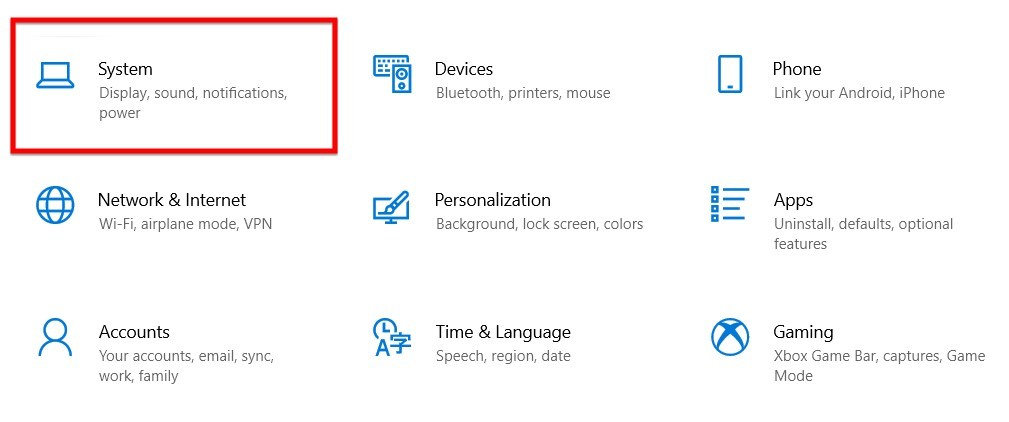
- Press Windows + I to open Settings.
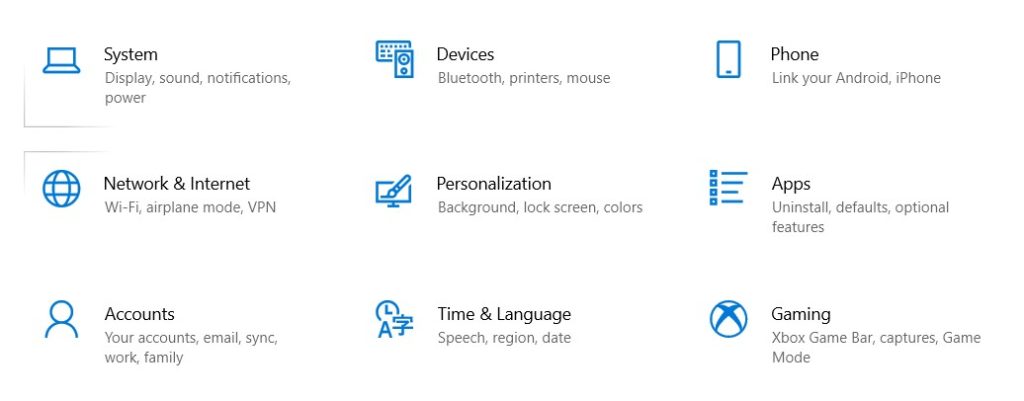
- Click on the System option.
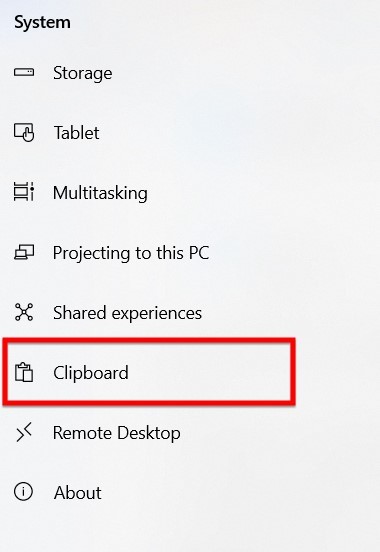
- In the System section, scroll down and click on the Clipboard option from the left side.
- Turn on the Clipboard history by toggling the switch to the On position.
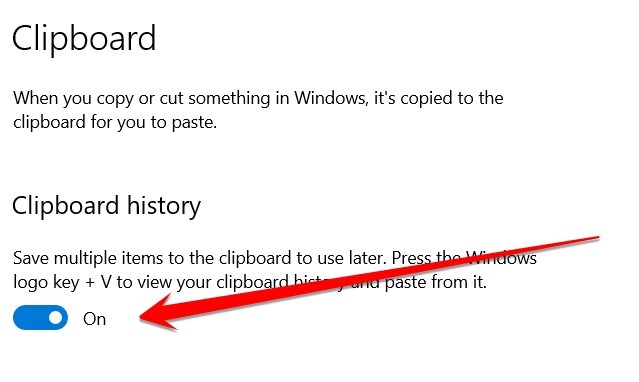
- Enable Clipboard sync across devices by selecting the switch beneath that option.
After completing those steps, the Windows + Shift + S shortcut should start working as intended.
Method 3: Enable the Snip & Sketch Notification
If you enable Snip & Sketch notification, you can fix Windows + Shift + S Not Working error in Windows 10. While this issue is certainly frustrating, there is a relatively simple fix that should get things up and running again in no time.
You only need to enable the Snip & Sketch notification from the Windows Action Center.
Here is a quick step-by-step guide on how to do it:
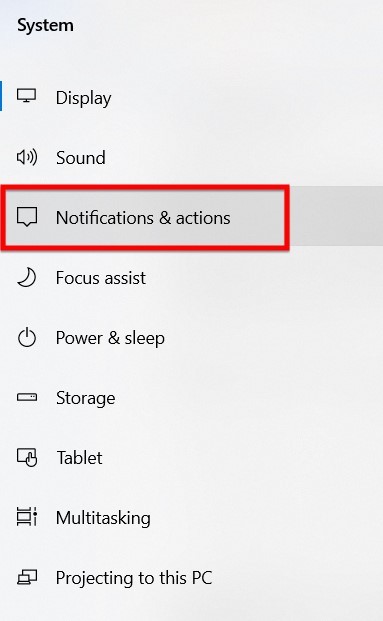
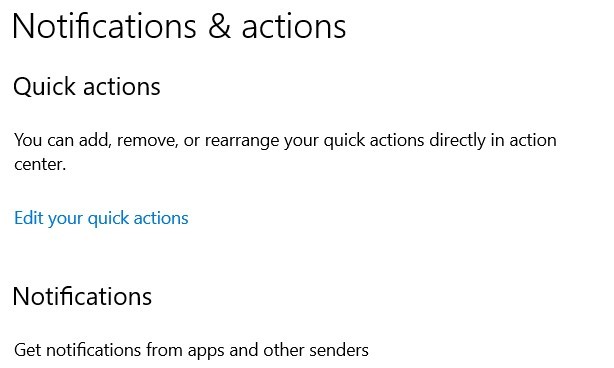
- Open the Settings app and navigate to System.

- And then click on the Notifications & Actions option.
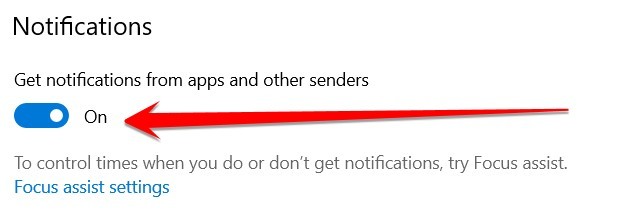
- Under the “Notifications” section, scroll down and find the entry for “Get notifications from apps and other senders.”
- Make sure that this setting is turned On.
- Scroll down to the bottom of the list and click on “Snip & Sketch.”
- Enable the toggle for “Show notifications.“
Once you’ve completed these steps, you should find that the Windows + Shift + S hotkey starts working as expected. So if you’ve been pulling your hair out to determine why this shortcut has stopped working, try this fix and see if it does the trick.
Method 4: Reinstall the Snip & Sketch
Many users have reported that they cannot use the Windows + Shift + S shortcut to launch Snip & Sketch and have had to resort to other methods of taking screenshots. Fortunately, this issue has an easy fix: reinstall Snip & Sketch.
For this, you need to follow these steps:
- First, close Snip & Sketch if it’s running.
- Next, go to Settings.
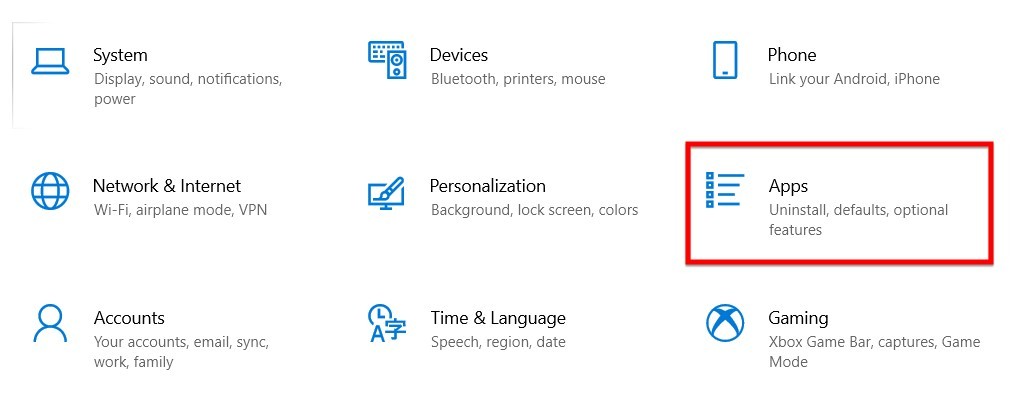
- Click on the Apps section and then Apps & Features list. Scroll down and find out Snip & Sketch application.
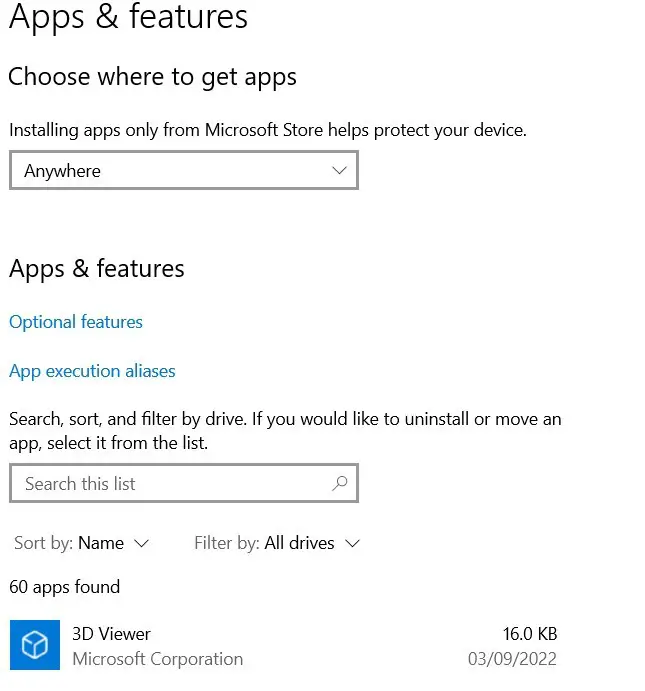
- In the list of apps, find and select Snip & Sketch.

- Select Uninstall, and then select Uninstall again to confirm.
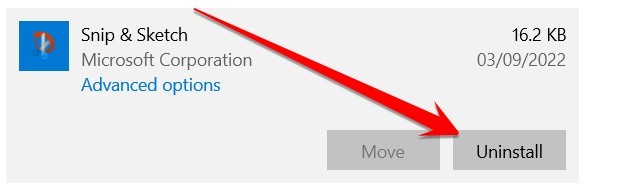
- After uninstalling Snip & Sketch, restart your computer. Once your computer has restarted, reinstall Snip & Sketch at the Microsoft Store.
- Once you’ve reinstalled Snip & Sketch, use Windows + Shift + S again. Snip & Sketch should now work as expected.
Method 5: Update the latest Windows files
Microsoft has released a new Update for Windows 10 that fixes the bug that caused the “Windows + Shift + S” shortcut to malfunction.
So, if you have been facing this issue, install this Update and Fix the problem. This Update is available through Windows Update, and you can Update your PC by using the following steps:
- First of all, go to Settings.
- Then click on “Update & Security.”
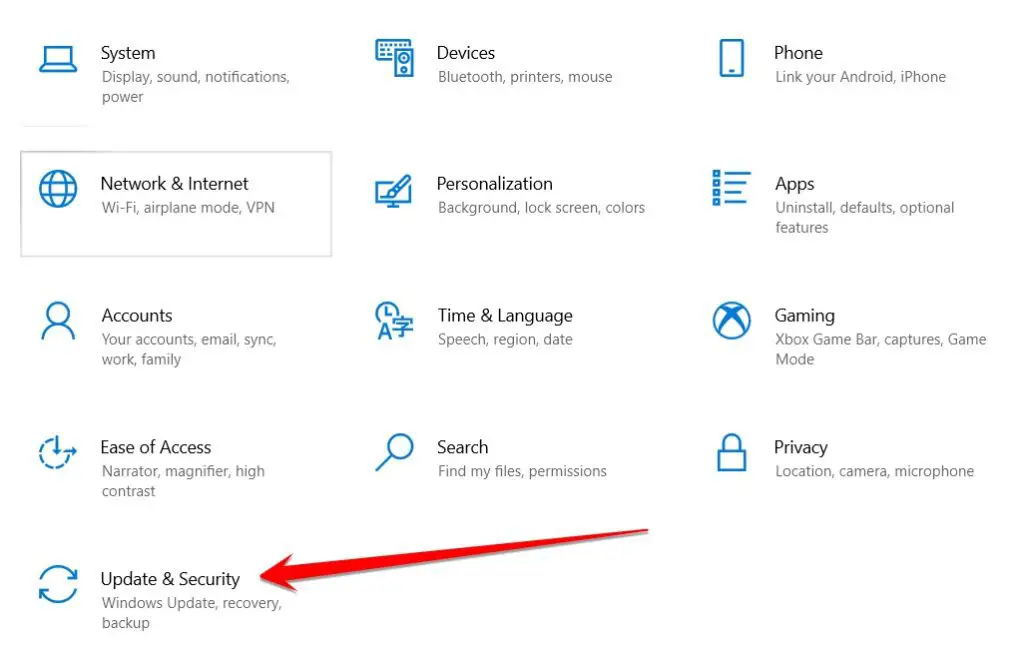
- Here, Click on the Check for updates or Resume updates button.
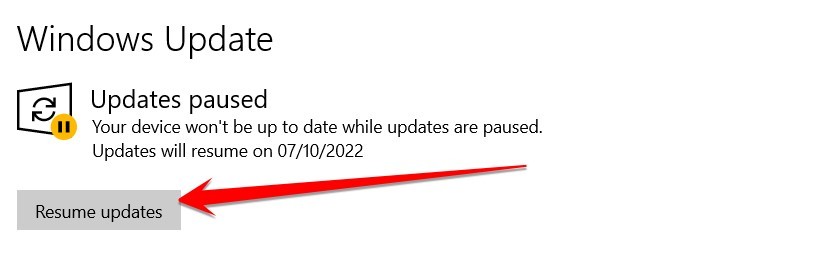
- Any new Update will download automatically if available for your PC. After installing the Update, restart your PC. The “Windows + Shift + S” shortcut will start working again.
How Do I Unlock My Windows Key?
First Method:
If you’ve lost your physical copy of Windows, the first place you’ll want to look is on your computer. The product key will often be printed on a sticker on the casing.
If you can’t find it there, it might also be in your computer’s BIOS or UEFI firmware settings:
- Restart your PC and press a key while booting up to access these settings.
- This key varies depending on your PC’s make and model, but it’s often F12, F9, F2, ESC, or DELETE.
- Once in the BIOS or UEFI settings menu, look for an option that says “Product Key” or “License Key.”
- If you see it, write down the product key and keep it in a safe place.
Second Method:
If you can’t find your product key anywhere on your computer or you’ve already reinstalled Windows without it, you’ll need to use a third-party tool to recover it from the registry. We recommend ProduKey from NirSoft. It’s free, portable, and doesn’t require Installation. Just download ProduKey and run it.
ProduKey will default show only the product keys for the current Windows installation. To see product keys for other versions of Windows (including older versions of Windows 10), select them from the drop-down menu at the top of the window.
ProduKey will then show all the product keys stored in the registry for those versions of Windows as well. When you find the product key you’re looking for, write it down and keep it safe; you’ll need it if you ever need to reinstall Windows again.
Why Won’t My Windows Take A Screenshot?
One of the most frustrating things when trying to take a screenshot is having Windows refuse to do it. There are a few possible reasons for this, but there are also a few potential solutions.
First, make sure that you have the correct keyboard shortcuts enabled. To do this, follow these steps:
- Search the Start menu for “Keyboard.”
- Once you’re in the Keyboard settings, find the “Print Screen” shortcut and make sure it’s turned on.
- If that doesn’t work, try restarting your computer. Sometimes Windows needs a fresh start to take screenshots properly.
- You can always use a third-party tool like Snagit or LightShot if all else fails.
These programs offer more robust screenshot options and are often more reliable than Windows’ built-in tools.
What is the Shortcut to Enable Snipping Tool?
Snipping Tool is a screenshot utility included in Windows Vista and later. It can take screenshots of an open window, a rectangular area, a free-form area, or the entire screen. Users can annotate the screenshot with colored pens or highlighter, save it as an image file, or email it.
To take a screenshot with Snipping Tool, follow these steps:
- Open Snipping Tool by pressing the Start button and searching for “Snipping Tool.”
- You can also use the keyboard shortcut Windows logo key + R, type the snipping tool into the Run dialog box that opens, then press Enter.
- Once Snipping Tool is open, click the down arrow next to “New.”
- Select the type of screenshot you would like to take.
- Use your mouse to select the area of your screen that you want to capture.
- To annotate your screenshot, click “Edit” in the top-left corner of the Snipping Tool window and click the pen or highlighter icon.
- To save your screenshot, click “File” in the top-left corner of the Snipping Tool window and click “Save As.”
Frequently Asked Questions
Why Is Windows + Shift + S Not Working In Windows 11?
If you’re a Windows user, you’ve probably grown accustomed to using the Windows + Shift + S shortcut to take screenshots quickly. But what if, all of a sudden, that shortcut stopped working? Why is Windows+Shift+S not working in Windows 11, and how can you fix it?
It turns out that there’s a reason why the shortcut might suddenly stop working – and it has to do with an update to the Snipping Tool. In previous versions of Windows, the Snipping Tool allowed you to take screenshots by hitting the Windows+Shift+S shortcut.
However, in the latest version of Windows, that shortcut has been replaced by a new one: Windows+Shift+A. So if you’re wondering why your favorite screenshot shortcut isn’t working anymore, that’s why.
Luckily, it’s easy to fix – update your shortcuts to use the new Windows+Shift+A shortcut instead. And if you’re not a fan of change, don’t worry – you can still use the old Windows+Shift+S shortcut in older versions of Windows.
Why My Keyboard Shortcuts Are Not Working?
First, check whether the shortcut keys have been reassigned in the Keyboard Shortcuts preferences. If so, you can easily revert them to their original assignments.
Second, ensure the keyboard layout is selected correctly in the Keyboard preferences. If you’re using a different keyboard layout than the one you assigned the shortcut to, the shortcut keys won’t work.
If these two solutions don’t work, try restarting your computer. Sometimes, a simple restart can fix strange issues with keyboard shortcuts.
If the problem persists, it’s time to troubleshoot. Begin by identifying which shortcuts are not working. Then, try reassigning them to different keys and see if that works. If not, try disabling and re-enabling the shortcuts in the Keyboard Shortcuts preferences.
As a last resort, resetting your entire Keyboard Shortcuts preferences file might be necessary. However, this will delete all your custom keyboard shortcuts, so create backups before doing this.
By following these steps, you’ll be able to identify and fix any issues with keyboard shortcuts quickly and efficiently.
How Do I Find My Keyboard Settings?
Microsoft Windows offers a variety of options for customizing your keyboard settings. You can access the keyboard settings by opening the Control Panel and clicking or double-clicking on the Keyboard icon.
In the Keyboard Properties window, you can change some basic settings for your keyboards, such as the key repeat rate and the cursor blink rate.
Conclusion
If you’re experiencing issues with the Windows + Shift + S shortcut not working in Windows 10, several potential solutions are available. This article has provided five methods to address the problem. Resetting the Snip & Sketch tool, enabling clipboard history, enabling the Snip & Sketch notification, reinstalling Snip & Sketch, and updating Windows files are all viable options to fix the shortcut issue.
Additionally, the article offers guidance on unlocking the Windows key if it’s lost and retrieving a product key for reinstallation purposes. It also addresses the common problem of Windows refusing to take screenshots and suggests enabling the correct keyboard shortcuts or using third-party tools as alternatives.
By following the instructions in this article, users can overcome the Windows + Shift + S shortcut not working issue and improve their overall Windows 10 experience.


