
If you’ve ever worked with Linux, chances are you’ve heard of the ps command. This handy tool is an essential part of any system administrator’s toolkit, and it can help you monitor, manage, and troubleshoot processes on your Linux machine.
In this article, I’ll take a deep dive into the ps command and show you how to use it to understand better what’s happening on your system. Whether you’re a seasoned Linux user or just getting started, I think this guide will be informative and helpful.
How to Use the ps Command
Before we start using the ps command, let’s look at its syntax. The basic syntax for the ps command is as follows:
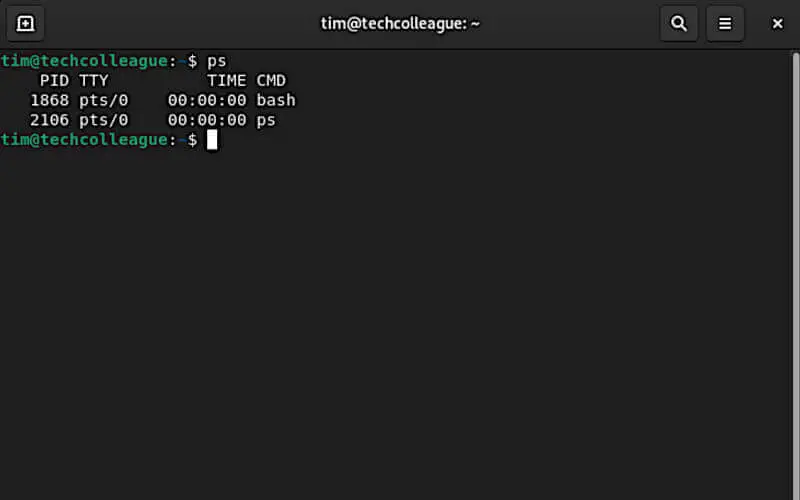
ps [options]To display a list of all the running processes on your system, you can type “ps” followed by the Enter key. This will give you a list of all the processes currently running on your machine, along with some basic information about each process, such as the process ID (PID), the user who owns the process, the amount of memory it’s using, and more.
If you want to filter the list of processes displayed by the ps command, you can use various options. For example, you can use the “-u” option to display only the processes owned by a specific user or the “-p” option to display information about a specific process ID (PID).
Another useful option is the “-f” option, which displays the processes in a full format that includes additional information such as the parent process ID (PPID), the process group ID (PGID), the terminal associated with the process, and more.
To sort the list of processes displayed by the ps command, you can use the “-o” option followed by a list of fields to sort by. For example, if you want to sort the processes by memory usage, you can use the following command:
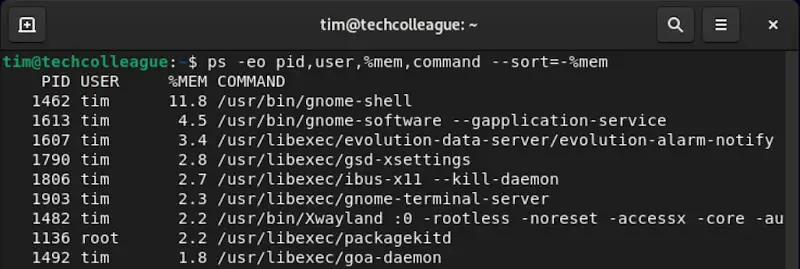
This will display a list of all the running processes, sorted by memory usage in descending order.
The ps command is invaluable for managing and monitoring processes on your Linux machine. Through its numerous options, you can customize the information displayed to better suit particular needs, such as filtering or sorting – providing great convenience.
Common Options for the ps Command
Now that we know the basics of using the ps command, let’s look at some of the most common options you can use to customize the output.
One of the most useful options is the “-e” option, which tells the ps command to display information about all processes on the system, not just the ones owned by the current user. This can be helpful if you’re trying to get a complete picture of what’s happening on your machine.
Another useful option is the “-u” option, which allows you to filter the output by the user. For example, if you want to see only the processes owned by the user “tim,” you can use the following command:
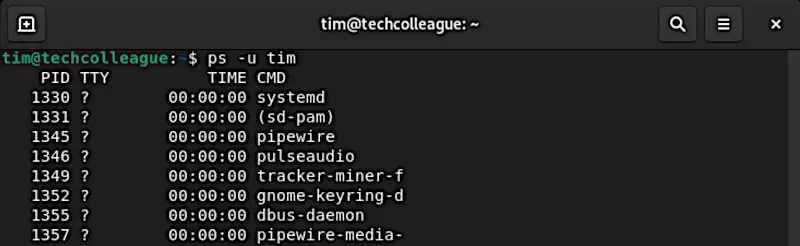
You can also use the “-p” option to display specific process ID (PID) information. For example, if you want to see information about the process with the PID 1330, you can use the following command:

If you want to see the processes in a tree format, you can use the “-f” option. This will display the processes in a hierarchical format, showing the parent-child relationships between processes.

Finally, if you want to see more detailed information about each process, you can use the “-l” option. This will display additional information such as the process’s start time, the amount of CPU time it’s used, and more.
These are just a few of the most common options available with the ps command. You can use many more options to customize the output, so be sure to check out the man page for more information.
Related: Linux ls Command Sort Files By Size
Advanced Usage of the ps Command
Now that we’ve discovered the fundamentals of using ps command, let’s explore a few more advanced application scenarios.
One useful feature of the ps command is the ability to display processes in real-time using the “watch” command. For example, if you want to monitor the memory usage of a specific process in real time, you can use the following command:
watch -n 1 'ps -p <PID> -o %mem'This will display the memory usage of the specified process (replace “<PID>” with the actual process ID) every second, allowing you to track changes over time.
Another useful feature of the ps command is the ability to display information about threads using the “-L” option. This can be helpful if you’re working with multi-threaded applications. For example, if you want to see information about all the threads associated with a specific process, you can use the following command:

This will display a list of all the threads associated with the specified process and information about each thread’s ID, CPU usage, and more.
If you want to see even more detailed information about processes, you can use the “-y” option to display information about process families. This can be helpful if you’re trying to understand the relationships between different processes running on your system.
Finally, if you’re working with many processes and want to filter the output more efficiently, you can use the “pgrep” command. This command allows you to search for processes based on their names or other attributes.
For example, if you want to find all the processes with “systemd” in their name, you can use the following command:
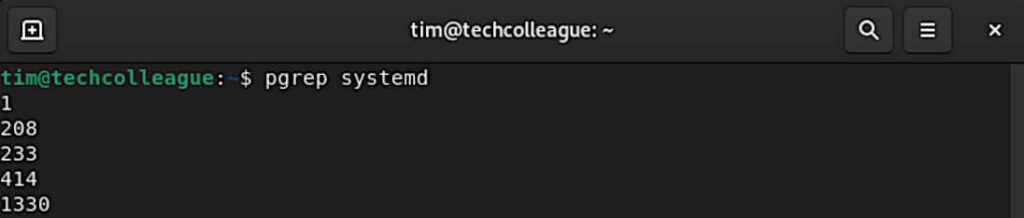
This will display a list of all the process IDs associated with processes that have “systemd” in their name.
These are just a few examples of the advanced usage scenarios you can achieve with the ps command. With some creativity and knowledge of the available options, you can use the ps command to gain a deep understanding of the processes running on your Linux machine.
Conclusion
The ps command is an incredibly powerful tool for monitoring processes on a Linux system. Whether you’re a system administrator or just a curious user, the ability to view and analyze running processes can be immensely helpful in understanding what’s happening on your machine.
In this article, we’ve covered the basics of using the ps command, including how to view information about running processes, customize the output, and use advanced features such as real-time monitoring and thread analysis.
While we’ve covered a lot of ground, there’s always more to learn about the ps command. With so many options and features available, the ps command is a versatile tool that can be used in many scenarios.
If you’re new to the ps command, I encourage you to experiment with some options and commands covered in this article. With a little practice, you can use the ps command to gain insights into your system and become a more efficient Linux user.


