BIOS stands for Basic Input/Output System and essentially acts as the brain of your computer. It’s responsible for monitoring the computer’s hardware components, determining the correct startup order, and launching system programs.
A BIOS update is often necessary when you install a new CPU. It can also resolve other issues and improve your computer’s performance. Updating BIOS without CPU is possible, but it requires much more work than using the standard process.
In this article, we’ll show you, with the help of some best methods, how to update your BIOS without a CPU using a flash drive.
What Is BIOS Flashback?
BIOS Flashback is a feature that allows you to update your BIOS without needing a CPU, memory, or even a video card. This is done using the onboard flash memory to store the BIOS image.
You would then use another PC to download the latest BIOS image from the manufacturer’s website and save it to a USB storage device. You can insert this USB storage device into your PC with the BIOS flashback feature and press the button to start flashing.
Why Should You Update A Motherboard BIOS?
Updating your motherboard’s BIOS can help you improve the performance and functionality of your motherboard. If you update your BIOS, your computer can run its operating system faster, manage resources more efficiently, and reboot quickly.
If we talk about the reasons, then there are several reasons why you should update your motherboard’s BIOS. The most important reason is to fix compatibility issues with new hardware or software.
Another reason to update your motherboard’s BIOS is to improve its performance. Updates often include optimizations that can make your computer run faster or more smoothly.
Lastly, updating your motherboard’s BIOS can protect against vulnerabilities. Hackers often look for outdated BIOS versions as a way to exploit computers. Updating to the latest version can help keep your computer safe from these attacks.
To avoid issues with your computer, you should update its BIOS. Updating the BIOS is a relatively quick and easy process and can be done either by using the manual update procedure or by using an automated method.
How To Check Your Current BIOS Version?
BIOS is a program that starts your computer and helps it run. It stands for Basic Input Output System. BIOS is important because it helps start your computer and load the operating system. Your computer’s BIOS version can be checked by following these simple steps:
- Press the Windows+R button to open the Run command.
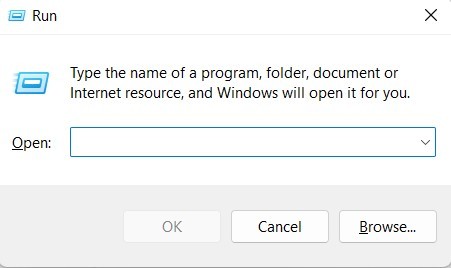
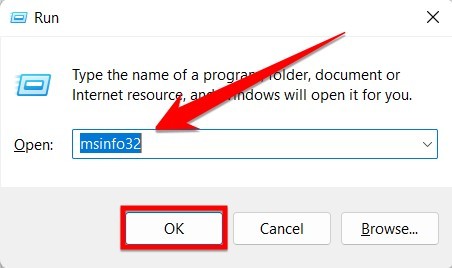
- Type in “msinfo32” and hit OK.
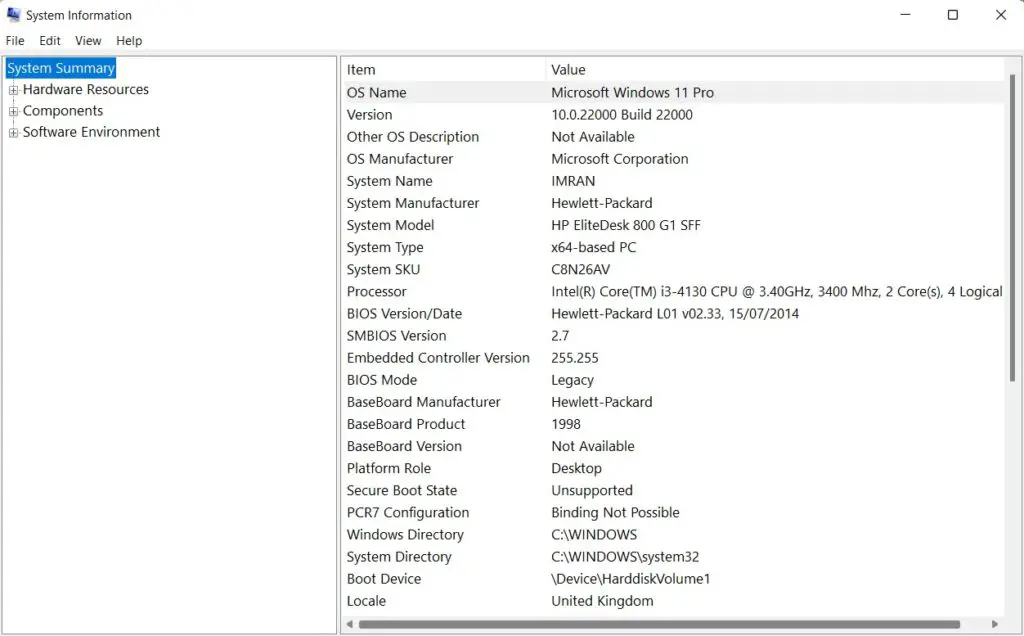
- The System Information window will open.
- On the right side of the window, you will see BIOS Version/Date.
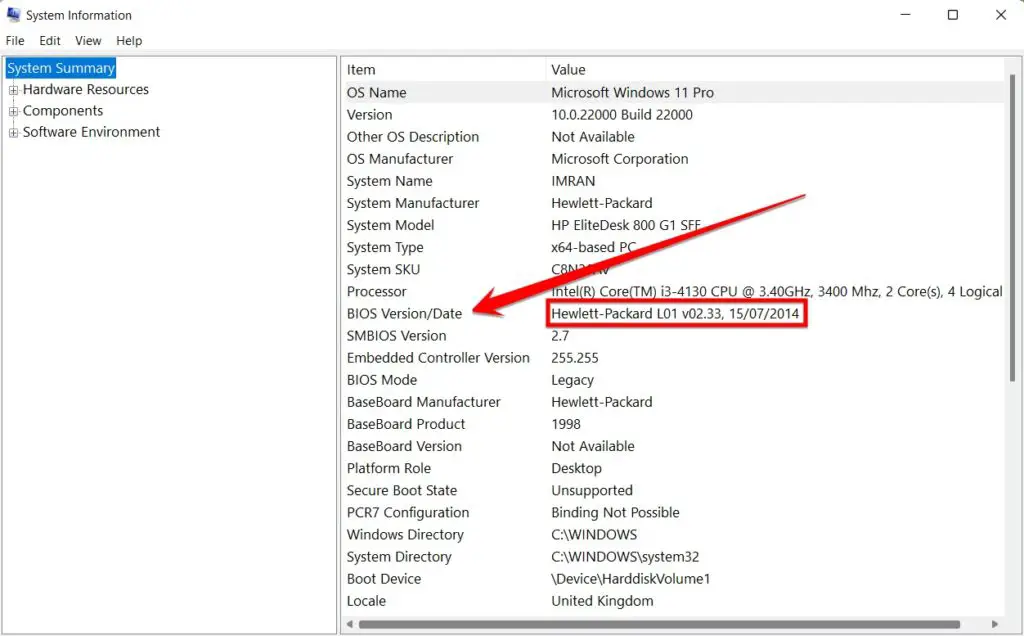
- This is where you can find out what your current BIOS version is.
Flashing BIOS Without CPU
Flashing BIOS without a CPU is a way to update the BIOS without using a CPU. This can be done by using a bootable USB drive or CD. Some motherboard manufacturers include a flashing utility on their installation media.
This utility allows users to update their BIOS without rebooting the system. The BIOS can be flushed from within Windows or using dedicated flashing software.
To flash BIOS without CPU, you need to follow these methods:
1. Download The Latest Motherboard BIOS File
Each motherboard has a BIOS file that needs to be updated regularly to keep the system running smoothly. The BIOS update can be found on the motherboard manufacturer’s website.
The process of updating the BIOS is usually straightforward.
It’s important to ensure that you’re downloading the correct file for your motherboard and following the instructions carefully.
BIOS updates can sometimes fix issues with your system, or they can add support for new hardware. Sometimes, a BIOS update is required to install a new operating system. It’s always a good idea to check for updates regularly, especially if you’re having problems with your computer.
So first, you have to download the BIOS for your computer motherboard. There is a separate BIOS for a separate system, so you download the BIOS keeping in mind the system requirements for your computer. The BIOS platforms for different systems are Gigabyte, AMD, and Intel.
Related: How to Fix No Bootable Devices Found
2. Extract The BIOS Update File
Updating your BIOS using a USB flash drive is relatively simple. To extract the bios update file to the FAT32 formatted USB flash drive. Once the file has been extracted, rename it to “BIOS.FL2“.
3. Connect Your Motherboard
You will need to use the 24-pin main power connector and the 8-pin EPS power connector to connect your motherboard to a power source. The 24-pin main power connector is located at the back of your motherboard, and the 8-pin EPS power connector is located at the top.
The 24-pin main power connector consists of 20 pins, and the 8-pin EPS power connector consists of 4 pins. When connecting your motherboard to a power source, ensure each pin is aligned correctly and that you do not force any connectors together.
Using a newer motherboard may require an 8-pin EPS12V power connector in addition to the standard 24-pin main power connector. This 8-pin EPS12V power connector is also located at the top of your motherboard and consists of 2 pins.
4. Press And Hold The Flash BIOS Flash Button
You will need to press and hold the Flash BIOS flash button for about three seconds until the LED light blinks. Once it starts blinking, you can release the button and proceed with the BIOS update.
5. Final Step
When the blinking stops, the update is finished. Remove the flash drive and turn off the power button.
Frequently Asked Questions
Can BIOS Flashback Fix Corrupted BIOS?
It is possible to fix a corrupted BIOS with ASUS’ BIOS Flashback feature. This allows users to flash a new BIOS version onto their motherboard without entering the operating system. To do this, users need only connect their power supply and press a button on the motherboard.
BIOS Flashback will then search for a compatible BIOS file on USB storage and flash it onto the motherboard. This process will take about 5 minutes, after which the user can restart their computer and boot into the new BIOS.
How to Install BIOS Without Display?
BIOS installation is a process that is usually done through the use of a display, such as a monitor or television. However, it is possible to install BIOS without using a display. One way to do this is by using a USB drive.
- Create a bootable USB drive with the BIOS installer.
- Then, insert the USB drive into the computer and turn it on.
- Press the key that opens the BIOS menu, which is usually F2 or DEL.
- Navigate to the Boot tab and select your USB drive from the list of devices.
- Click Save and Exit, then reboot your computer.
- The BIOS will install automatically, and you can use your computer normally once it has finished booting up.
What To Do If Main BIOS Is Corrupted?
The BIOS is a key part of your computer; if it becomes corrupted, you may experience problems starting your PC. If this happens, you can do a few things to try to fix the issue.
One thing you can try is to remove the CMOS battery from your computer for a few minutes. This will reset the BIOS settings to their default values. If that doesn’t work, you can try reinstalling the BIOS using the manufacturer’s instructions.
If none of these methods work, you may need to send your computer in for repair.
Is It Dangerous To Update BIOS?
BIOS updates are released by computer manufacturers to improve system stability, fix bugs, and add new features. While they can be helpful, they can also be dangerous if not installed correctly.
If something goes wrong during the update process, it could damage your computer’s hardware or software. In some cases, you may even lose all your data.
That’s why it’s important to back up your data before you start the update process. It’s also a good idea to read the instructions carefully and ensure you know what you’re doing. If you’re not comfortable updating your BIOS yourself, you can always take your computer to a technician for help.
Is BIOS Flashback Safe?
BIOS flashback is a BIOS recovery feature that allows you to update the BIOS firmware without going through the long and tedious process of booting up from a USB drive or CD. It’s a great feature, but is BIOS flashback safe?
The answer is yes, BIOS flashback is safe. However, there are some things you should keep in mind before using it. First of all, make sure your motherboard supports BIOS flashback. If it doesn’t, you won’t be able to use this feature.
Also, make sure your BIOS firmware is up to date. If it isn’t, update it before using BIOS flashback. And finally, always create a backup of your current BIOS firmware before flashing it with a new one. If something goes wrong, you can always restore your old BIOS firmware.
What Happens If You Boot A PC Without CPU?
When you turn on a PC, the first thing that happens is the BIOS does a power-on self-test or POST. This checks all of your system’s hardware to ensure it’s working properly. One of the things it checks for is the CPU. If there’s no CPU, the BIOS will error out and stop the boot process.
You might be wondering why this is. After all, other components in your system can still function without a CPU. The answer has to do with how the PC communicates with those components.
The CPU acts as a traffic cop, telling all of the other components what to do and when to do it. If there’s no CPU, that communication doesn’t happen, and everything falls apart.
Will Case Fans Turn On Without CPU?
In computer cooling, there are three main types of fans: case fans, CPU fans, and graphics card fans. In most cases, all three are necessary for optimal cooling. However, some cases come with a built-in CPU fan and don’t require an additional one.
So the question becomes, will the case fan still turn on without a CPU fan?
Yes, the case fan will still turn on without a CPU fan in most cases. This is because the case fan is responsible for cooling the system as a whole, not just the CPU. However, if there is no CPU fan, the motherboard will overheat and be damaged.
So while the case fan will still turn on without a CPU fan, it’s best to use one for optimal cooling.
How Much Time Does BIOS Flashback Take?
BIOS flashback is a convenient feature that allows you to flash your BIOS without having to enter the BIOS setup. This can be a real-time saver if you need to update your BIOS often. But how much time does it actually take?
To find out, I timed how long it took to flash my BIOS using the ASUS EZ Flashback tool. The process took just under 2 minutes. Not bad! So if you need to update your BIOS often, the EZ Flashback tool is the way to go.
What Type of USB Drive Do You Need for BIOS Flashback?
USB drives are a necessary part of BIOS flashback. To properly complete the BIOS flashback process, you will need a USB drive of at least 8GB. The drive does not need to be anything special, as long as it is formatted in FAT32.
Once you have inserted the drive into your computer, make sure you copy the BIOS files onto the root of the USB drive. After doing this, unplug your computer and plug it back in. At this point, you should see a new boot option that says “BIOS Flashback.
Conclusion
Updating your BIOS without a CPU is possible, but it can be tricky. Make sure you follow the instructions given in this blog post closely to avoid any problems. And if you follow these instructions carefully and correctly, you can easily update your PC BIOS without CPU in a few minutes.


