

VirtualBox is a popular virtualization software that allows you to run multiple operating systems on your computer. One of the operating systems you can install on VirtualBox is Debian, a free and open-source operating system that is widely used on servers and other machines.
In this article, I will walk you through installing Debian on VirtualBox.
Prerequisites
Before you start, make sure you have the following:
- A computer with at least 4GB of RAM.
- VirtualBox software is installed on your computer. You can download it from the VirtualBox website if you don’t have it.
- A stable internet connection.
- At least 20GB of free disk space on your computer.
Step 1: Download the Debian ISO file
The first step is to download the Debian ISO file. This is the file that contains the installation files for Debian. Go to the Debian website to download the ISO file and select the “Download an installation image” section.
This will take you to the download page, where you can choose the architecture (32-bit or 64-bit) and the version of Debian you want to install.
Step 2: Create a new virtual machine
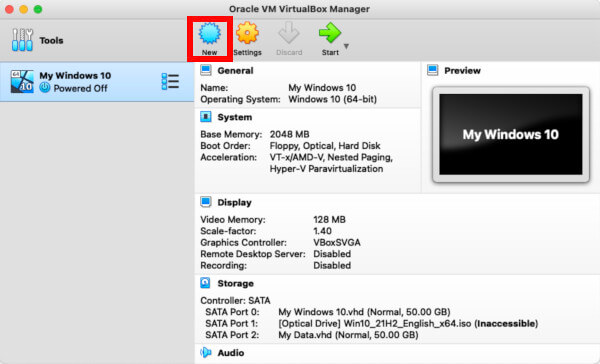
Next, launch the VirtualBox software and click on the “New” button to create a new virtual machine. In the “Name and operating system” window, enter a name for your virtual machine and select “Linux” as the type and “Debian (64-bit)” as the version. Click on the “Continue” button to continue.
Step 3: Set up the memory and hard drive
In the next window, you will be asked to set up your virtual machine’s memory and hard drive. For the memory, allocate at least 2048MB (2GB). For the hard drive, you can either create a new one or use an existing one.
If you want to create a new one, select “Create a virtual hard drive now” and click on the “Create” button. In the next window, choose “VDI (VirtualBox Disk Image)” as the hard drive file type and “Dynamically allocated” as the storage on a physical hard drive.
Then, specify the hard drive size (at least 20GB) and click on the “Create” button.
Related: How to Use Linux Screen
Step 4: Configure the virtual machine
After creating the virtual machine, you will see it listed in the main window of VirtualBox. Select the virtual machine and click on the “Settings” button to configure it. In the “Settings” window, go to the “System” tab and set the “Boot Order” to “Optical” first.
Then, go to the “Storage” tab and click on the “Adds optical drive” button. In the next window, select the “Add Disk Image” option and browse to the location where you downloaded the Debian ISO file.
Step 5: Start the virtual machine
Now that you have configured the virtual machine, you can start it by clicking on the “Start” button. This will launch the Debian installer in the virtual machine. Follow the on-screen instructions to install Debian on the virtual machine.
Related: How to Fix “Yarn Command Not Found”
Step 6: Configure the network
After installing Debian, you need to configure the network so that you can connect to the internet. To do this, go to the “Network” tab in the “Settings” window and select the “NAT” network mode. This will allow the virtual machine to access the internet through your host computer’s network connection.
Step 7: Install the VirtualBox Guest Additions
The VirtualBox Guest Additions are a set of additional software that enhances the performance and functionality of the virtual machine.
To install the Guest Additions, follow these steps:
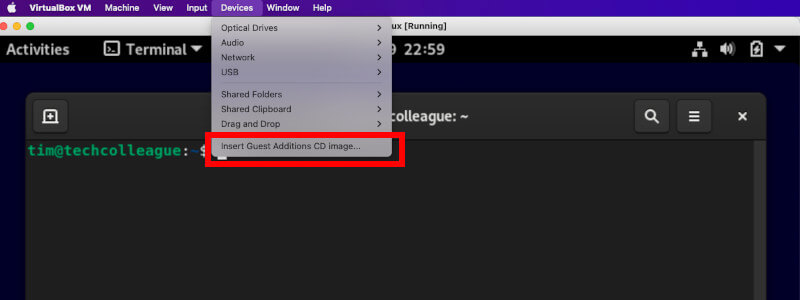
- In the main menu of the virtual machine, go to “Devices” and select “Insert Guest Additions CD image.” This will mount the Guest Additions ISO file and display a notification on the virtual machine’s desktop.
- Open a terminal and enter the following command to update your Debian system:
sudo apt-get update- Enter the following command to install the necessary packages:
sudo apt-get install dkms build-essential linux-headers-$(uname -r)- Enter the following command to mount the ISO file:
sudo mount /dev/cdrom /mnt- Change to the directory where the ISO file is mounted and run the installation script:
cd /mnt
sudo sh VBoxLinuxAdditions.run- Once the installation is complete, reboot the virtual machine to apply the changes.
Step 8: Configure the display settings
The virtual machine’s display default may be set to a low resolution. To increase the resolution, go to the “Display” tab in the “Settings” window and increase the “Video Memory” to at least 16MB.
You will need to power off the existing virtual machine and start it up again for changes to take effect.
Step 9: Install additional software
Now that you have installed Debian on VirtualBox, you can install additional software to customize your virtual machine.
Some helpful software you may want to install includes:
- A web browser such as Mozilla Firefox or Google Chrome.
- An office suite like LibreOffice or OpenOffice.
- An email client like Thunderbird.
- A media player like VLC.
You can install these and other software using the “apt” command in the terminal or by using the “Software Center” application.
Conclusion
Installing Debian on VirtualBox is a straightforward process that allows you to test and use the operating system without making any changes to your host computer. With the steps outlined in this article, you should be able to set up a virtual machine and install Debian on it in no time.
I hope this guide has been helpful and that you enjoy using Debian on your virtual machine.


