
Thermal paste is a substance used to improve the heat conduction between two surfaces in close contact, such as a CPU and its heatsink or a GPU and its heatsink. Its primary purpose is to fill in the microscopic imperfections and gaps between the two surfaces, allowing for better heat transfer and dissipation.
You’re in the right place if you’re wondering how much thermal paste to use on your GPU.
In this article, we’ll discuss the importance of thermal paste, the different factors that can affect the amount of thermal paste needed, and how to apply thermal paste to your GPU in the most effective way.
How Much Thermal Paste On GPU?
When applying the thermal paste on a GPU, it’s essential to make sure that you apply the right amount. Too much past and the fan won’t be able to disperse heat efficiently, while too little will reduce its cooling capabilities.
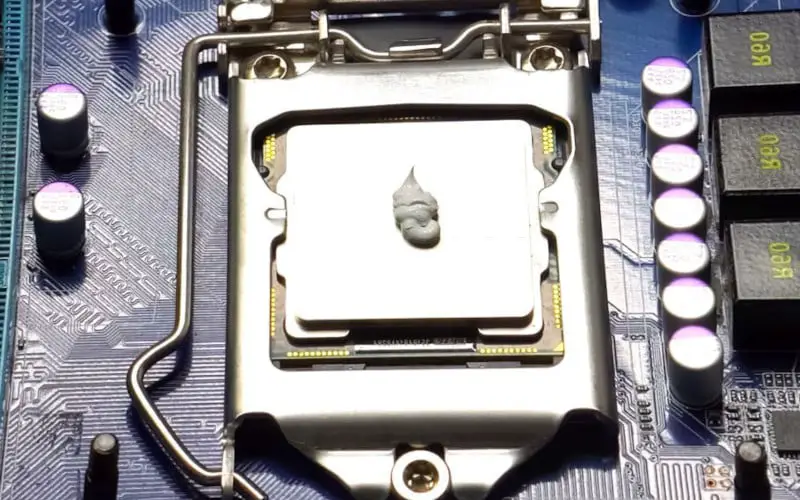
Therefore, you must apply the paste in the middle of the chip and give it a dot-like shape similar to two rice grains in size. Doing this ensures that when the heatsink squeezes, it spreads over every part of the chip evenly so your system can stay cool for optimal performance.
Why is Thermal Paste Important?
Thermal paste is an essential component of any computer system, as it helps to keep your CPU and GPU running at optimal temperatures. If your CPU or GPU runs too hot, it can cause performance issues, shorten lifespan, or even cause it to fail.
On the other hand, if your CPU or GPU is running too cool, it can also cause problems. For example, if your GPU is running too cool, it may not be able to perform at its maximum potential, which can lead to lower frame rates in games or slower rendering times in graphics-intensive applications.
Therefore, using the right amount of thermal paste is essential to ensure that your CPU and GPU run at the optimal temperature for maximum performance and longevity.
Factors That Affect the Amount of Thermal Paste Needed
Several factors can affect the amount of thermal paste needed for your GPU:
- The size of the GPU and heatsink: The larger the surface area of the GPU and heatsink, the more thermal paste you will need.
- The quality of the thermal paste: Some thermal pastes are more effective at conducting heat than others. If you’re using a high-quality thermal paste, you may need to use less of it to achieve the same level of heat transfer as a lower-quality paste.
- The quality of the GPU and heatsink: The smoother and flatter the surfaces of the GPU and heatsink, the less thermal paste you will need. If the surfaces are rough or uneven, you may need more thermal paste to fill in the gaps and imperfections.
- The ambient temperature: If you’re using your computer in a hot environment, you may need more thermal paste to compensate for the increased heat dissipation.
How to Apply Thermal Paste to Your GPU?
Before we begin, it is essential to note that applying thermal paste is a delicate process and requires a certain level of care and attention. It is best to handle your GPU with clean hands and use a clean, flat surface to work on.
Let’s take a look at the steps involved in applying thermal paste to your GPU:
- Preparation: First, you will need to gather all the necessary materials. This includes a small amount of thermal paste, a clean cloth or paper towel, and a flat, clean surface to work on. You will also need to shut down your computer and remove the GPU from the motherboard.
- Cleaning: Next, you will need to clean the surfaces of the GPU and the heatsink. Use a cloth or paper towel to remove any dirt or debris gently. Be sure to avoid using harsh chemicals or abrasive materials, as these can damage the surfaces of the GPU and heatsink.
- Applying the Thermal Paste: There are several methods for using thermal paste, but the most common is the “pea method.” To do this, you will need to place a small pea-sized amount of thermal paste onto the center of the GPU. Then, using a clean finger or a flat tool (such as a plastic card), spread the paste evenly across the surface of the GPU, ensuring to fill in any gaps or imperfections.
- Installing the Heatsink: Once the thermal paste has been applied, you can install the heatsink onto the GPU. Press down on the heatsink until it is securely attached to the GPU. Be sure not to use too much pressure, as this can damage the GPU or heatsink.
- Testing: Once the heatsink has been installed, you can turn your computer back on and test to ensure that the GPU is functioning correctly. If you notice any overheating issues, you may need to reapply the thermal paste or check for other issues.
It is vital to regularly check and maintain the thermal paste on your GPU to ensure it is functioning correctly. The paste can become old and less valuable over time, or it might be contaminated, which would not work as well.
If you notice that your GPU is running hot or experiencing issues, it may be time to reapply the thermal paste.
Tips for Applying Thermal Paste
Here are a few additional tips to keep in mind when applying thermal paste to your GPU:
- Use a small amount: It is essential to use only a tiny amount of thermal paste when applying it to your hardware. Too much paste can hinder heat transfer, creating air pockets or excess resistance. A pea-sized amount is usually sufficient for most applications.
- Spread evenly: Once the thermal paste has been applied, it is important to spread it evenly across the surface of the hardware. Using a clean finger or a flat tool (such as a plastic card) can help ensure that the paste is spread evenly and fills in any gaps or imperfections.
- Avoid excess pressure: When installing the heatsink or other hardware, it is vital to avoid applying it. This can damage the hardware or cause the thermal paste to become displaced. Gently press down on the heatsink or hardware until it is securely attached.
- Clean surfaces: It is essential to clean the surfaces of the hardware and heatsink before applying thermal paste. Be sure to avoid using harsh chemicals or abrasive materials, as these can damage the surfaces of the hardware and heatsink.
- Check regularly: It is essential to regularly check and maintain the thermal paste on your hardware to ensure it is functioning correctly. Over time, the paste can dry out or become contaminated, reducing its effectiveness. If your hardware is running hot or experiencing issues, it may be time to reapply the thermal paste.
- Use a high-quality paste: Using a high-quality thermal paste can help improve the performance and lifespan of your hardware. Look for a paste with a high thermal conductivity rating and low resistance to heat transfer.
- Follow manufacturer’s instructions: Be sure to follow the manufacturer’s instructions when applying thermal paste to your hardware. Different paste types may require different application methods or amounts, so it is essential to follow the instructions provided.
Related: Is Thermal Paste Toxic?
Conclusion
The amount of thermal paste to apply to your GPU will depend on the specific hardware and application. A small, pea-sized amount is usually sufficient, and it is essential to spread the paste evenly and avoid using too much.
Regularly checking and maintaining the thermal paste can help ensure that your GPU runs at its best.


