If you’ve ever seen the error message “Could not create the Java Virtual Machine,” it’s probably because you tried to run a Java application or game without having Java correctly installed on your computer.
Java is a programming language that enables developers to create various applications and games, many free online. To run these applications, your computer needs to have a piece of software called a Java Virtual Machine (JVM), typically included with the Java installation.
However, if you try to launch a Java application without first installing Java, you’ll see the “Could not create the Java Virtual Machine” error message. You’ll need to install Java on your computer to fix this problem and then try relaunching the application.
So, if you are also facing this error, then don’t worry because, in this article, I will tell you some methods that will help you fix this error. You have to follow the methods below, and your problem will be solved.
What is the Java Virtual Machine?
Java Virtual Machine (JVM) is the engine that runs Java applications on a computer. It provides instructions on how to execute the code written in Java. The JVM interprets and executes Java bytecode directly without requiring a human compiler.
This allows Java code to run faster on computers than traditional programming languages because the JVM does not require compilation before it can run.
The JVM was created by James Gosling, the Java programming language creator, at Sun Microsystems in 1989. It was originally designed to be a lightweight version of the Java bytecode interpreter, originally developed by Gosling and Bill Joy at Sun Microsystems.
The Java Virtual Machine (JVM) is the core component of the Java platform, which provides a consistent programming environment for applets and applications written in the Java programming language.
What Causes the Error “Could Not Create The Java Virtual Machine?”
Virtual machines are a fundamental part of the Java programming language. They allow programs to run on different platforms without changing the code. A virtual machine is a program that translates code from one platform to another. In Java, virtual machines create executable (.exe) files.
The error “Could not create the Java Virtual Machine” means insufficient memory was available for the virtual machine. The memory is the space on your computer available to the Java virtual machine.
If you have enough memory, you can run Java programs. The Java virtual machine cannot create executables (.exe) files if you don’t have enough memory.
There are a few reasons why a user might encounter the error “Could not create the Java Virtual Machine”:
- The user has insufficient memory to run Java applications.
- The user’s computer does not have the necessary hardware installed.
- The user’s software is outdated and no longer supports Java.
- The user does not have a valid Java license.
- The user has an older version of Java installed.
- The user runs a computer with a low-end processor.
- The user runs a laptop computer with less than 2GB of RAM.
- The user has not yet installed Java on their computer.
How to Fix Content Not Create The Java Virtual Machine
Method 1: Make Sure Java Is Installed Correctly
The Java virtual machine (JVM) is an essential software that runs on your computer to execute Java applications. If you’re experiencing problems with your Java installation, it’s important to ensure the JVM is installed correctly.
Here is a simple method that can help you to make sure Java is installed correctly on your computer:
- Press the Windows+S button to open the Search box.
- Type the “command prompt” in the Search box and press Enter.
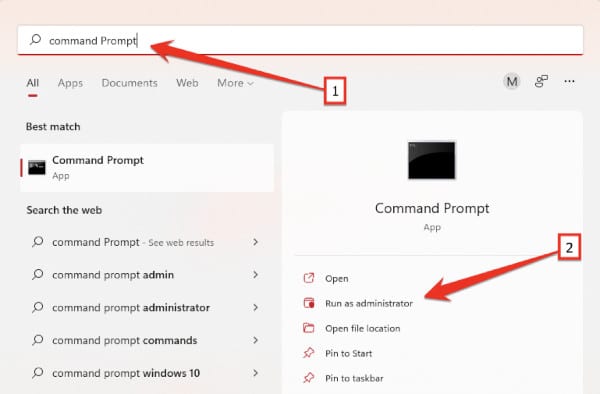
- When the Command Prompt opens, type the following command and press Enter.
java –version- You see the Java version if Java is installed correctly on your computer. If Java is not installed correctly, it will say to install the latest version of Java.
Method 2: Set Up A New System Variable For Java
If you are experiencing problems with Java, likely, you are not setting up the environment correctly. This article will explain how to fix a common issue: could not create the Java Virtual Machine. By following these simple steps, you can get Java working again.
Make sure that all of your system variables are set up correctly. This includes your PATH, JAVA_HOME, and JDK_HOME settings. If you use a distribution package such as Ubuntu or Debian, you may find the variables already configured for you.
To set up a new system variable for Java, you need to follow these steps:
- First of all, open the Run command by pressing the Windows+R.
- Type the following command and press Enter.
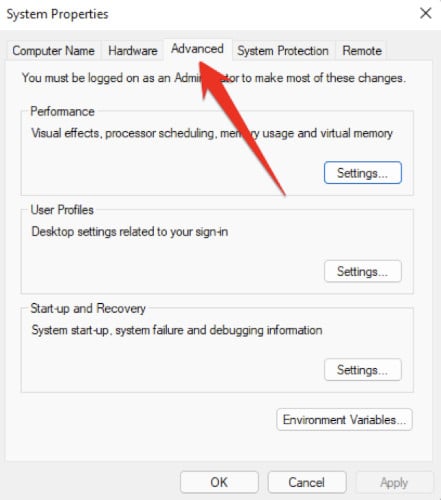
sysdm.cpl- After opening the System Properties, click the Advanced tab.
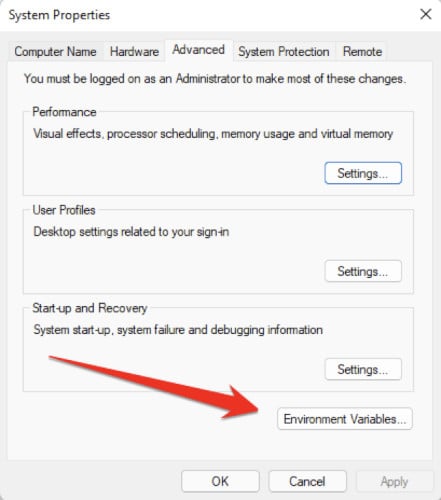
- Click on the “Environment Variables” option at the bottom of the Advanced portion of the System Properties window.
- Click on the New button below the System variables box.
- Here, you need to type “_JAVA_OPTIONS” in the Variable name text box.

In the second box name Variable value, type “–Xmx512M” and then press the OK button to save it.

Method 3: Set Java to Open as an Administrator
Suppose you have experienced trouble creating a Java virtual machine. In that case, you may receive the following error when launching the Java installation program: “Could not create the Java virtual machine.” If so, you may need to run Java as an Administrator.
Follow these steps:
- First, press Windows+S to open the Windows Search box and type Java in the Windows Search box.
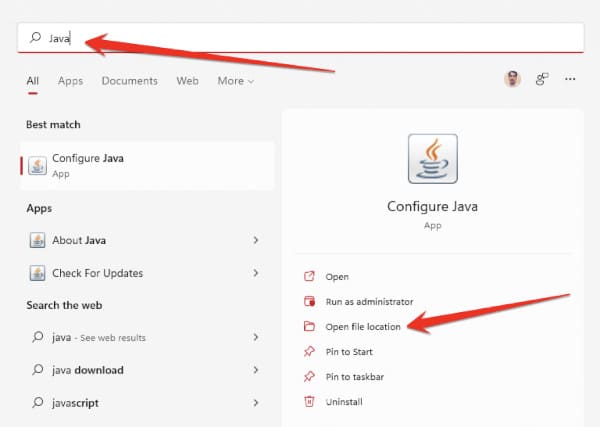
- After opening the file location, just right-click the Configure Java icon and click Properties.
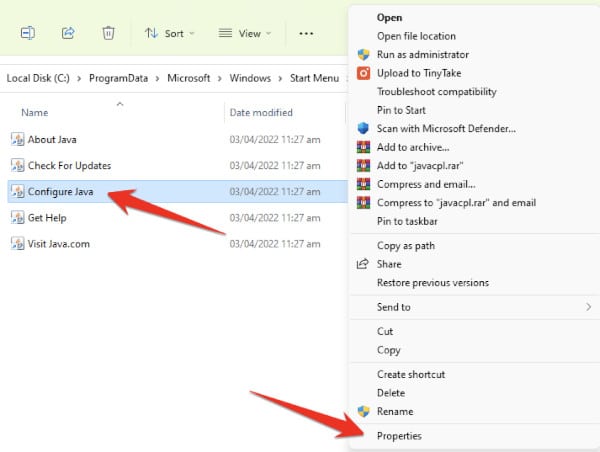
- After opening the Configure Java Properties, go to the Compatibility tab.
- In the Compatibility tab, check the “Run this program as an administrator” option in the compatibility portion.
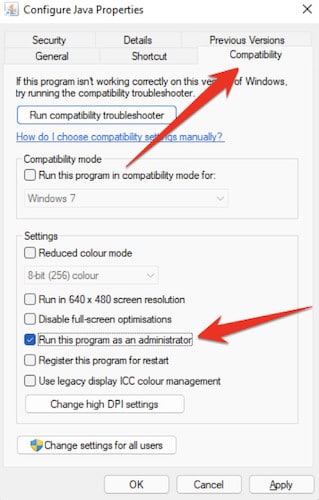
- After selecting the “Run this program as an administrator” program, you have to click the Apply button and then the OK button. It is best to restart your computer once it is done, which will help you to eliminate such errors.
Method 4: Reinstall Java to Fix “Could Not Create The Java Virtual Machine
Fixing Java errors is an easy task if you know where to look. If you are experiencing a Java computer error, the first step is to reinstall Java. Reinstalling Java will fix the problem and return your computer to normal.
Follow these steps and fix this issue:
- To execute this method, first, open the Window Run command.
- Type the following command and press Enter.
appwiz.cpl- This command uses the Programs and Features in the Control Panel as shortcuts to open the Uninstall window. When you enter, a window to uninstall programs and features will open.
- Now in this window, find Java, right-click, and select Uninstall.
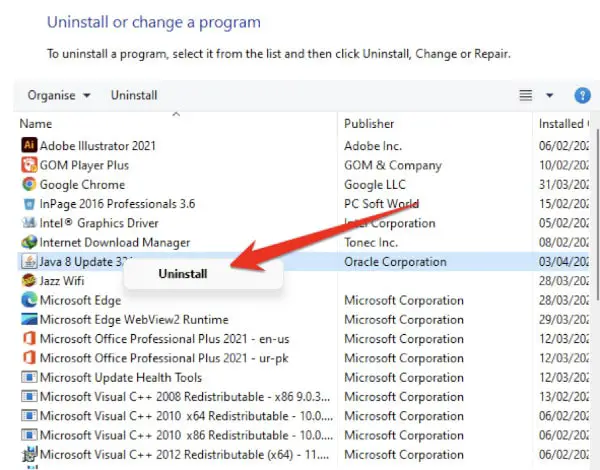
- After uninstalling Java software, you need to restart your PC to make changes.
- After restarting your computer, you need to download the latest version of Java from its official site and install it. I hope this method will help you quickly fix the ‘Could not create the java virtual machine” error.
Method 5: Use a Java Virtual Machine Online
If you are getting the “Could Not Create The Java Virtual Machine Computer” error, there is a chance that you can fix it by using a Java Virtual Machine online. This is software that lets you run programs on your computer that are written in Java.
This is different from running programs on your computer written in another language.
When you use a Java virtual machine online, it runs the program in its memory space. The program cannot corrupt or damage your computer’s other files. Additionally, this software has been designed to be quick and easy to use. All you need to do is download and install it.
Once it is installed, all you have to do is click on the icon of the Java virtual machine online and start running the program you want to use.
How Do You Fix JVM That Could Not Be Started?
JVM could not be started. Many reasons can cause this, and fixing it can be difficult.
Here are some tips to help you get started:
- Make sure that your system is up-to-date.
- Verify that all required libraries are installed.
- Check for missing dependencies.
- Verify that your JVM is configured properly.
- Try restarting the Java process using javac -r or java -r.
- If necessary, try removing any legacy Java applications from your system and reinstalling the latest version of Java.
How Do I Create a Java Virtual Machine?
Creating a Java Virtual Machine (JVM) is essential for any Java developer. There are several ways to create a JVM, but the most common approach is to use the Java JDK.
To create a JVM using the Java JDK, follow these steps:
- Download and install the Java JDK.
- Open a Command Prompt window and navigate to the directory where you installed the Java JDK.
- Type javac -version to verify that you have the correct version of the Java JDK installed.
- Type javac -classpath <path_to_Java_JDK> <file_name> to compile a class file or jar file in your current directory.
What is Coming in Java 16?
Java 16 is the next version of Java. It was released in September 2017.
Here are some of the key features of Java 16:
- The new version supports 64-bit computing and can run on desktop and mobile devices.
- It has an updated compiler that makes it faster than previous versions and easier to use.
- It comes with a new feature called the “type inference” which makes it easier to code by not specifying the type of variables or methods.
- Java 16 also includes updates to the standard library, such as better functional programming and data analysis support.
Frequently Asked Questions
What is JVM in Simple Words?
Java Virtual Machine or JVM is an integral part of Java development. It is responsible for running Java programs and allows developers to use the language on different platforms, including Windows, Linux, and Mac OS. JVM is invoked by the Java application when it needs to run a Java program.
JVM provides an environment for executing Java bytecode, which can be compiled into executable files. JVM also manages the memory space the Java programs use, and resolves reference to classes, methods, and fields in the runtime environment.
What is a Virtual Machine Error in Java?
A virtual machine error in Java can occur when executing a program compiled with the -verbose flag. This flag lets the virtual machine print out information about each executed instruction.
One of the messages produced by the virtual machine is called a java.lang.VirtualMachineError. This error typically occurs when an invalid operation is attempted on an object not intended to be operated on by the virtual machine.
Is It No Longer a Supported Option Error That Could Not Create The Java Virtual Machine Netbeans?
Netbeans is a popular IDE used for developing Java applications. Recently, users have reported errors when creating a new Java virtual machine (JVM). The error message is “Is no longer a supported option error could not create the Java virtual machine Netbeans.” This problem appears to be affecting both new and existing users.
Netbeans recommends that users switch to Oracle’s Java 8 JVM. Oracle has released security updates for Java 8 that address several issues in the software. Oracle recommends that users switch to Java 8 and discontinue using earlier versions of the JVM.
Users unable or unwilling to upgrade to Java 8 may experience problems with their Netbeans installations. If you are experiencing issues with your Netbeans installation, please get in touch with the software vendor for support.
Final Thoughts
Many computer users have encountered the “could not create the java virtual machine” error. Various factors, including damage or corruption in the Java installation, partial or incomplete Java uninstallation, and more, can cause this error. Fortunately, there are a few simple methods that can help to fix this error.
In most cases, simply reinstalling Java will resolve the issue. However, if that does not work, deleting any residual files from a previous Java installation is necessary.
Additionally, it is crucial to ensure no conflict between different versions of Java installed on the computer. You can quickly and easily fix the “could not create the java virtual machine” error by following the methods above.

